DLS microrheology is based around extracting linear rheological properties from the motion of colloidal probe (tracer) particles, of known size, undergoing thermal fluctuations (from Brownian motion) in a system at thermodynamic equilibrium.
Relationships have been derived that enable quantitative rheological data over a wide range of frequencies, and which have been shown to hold, in general, across a variety of complex fluid types.
Data can be obtained for the frequency-dependent viscoelastic moduli - G', elastic (storage) modulus and G", viscous (loss) modulus - from which the frequency-dependent complex viscosity, η*, can also be calculated.
Since no external forces are exerted on the probe (tracer) particles, DLS microrheology is a passive technique, and can also be described as thermal diffusion microrheology.
DLS microrheology measurements are particularly suited to the measurement of low viscosity and weakly-structured materials, such as polymer and biopolymer (e.g. protein) solutions. The technique extends rheological data into the high frequency range, which is a requirement to access the short timescale dynamics of such systems (and goes well beyond the inertia-limited capabilities of mechanical rheometers in this respect).
A microrheology test requires the measurement of the correlation function of the probe (tracer) particles in the sample under test. The Mean Square Displacement (MSD) of probe particles is then calculated, from which the rheological properties of the sample are subsequently evaluated (using the Generalized Stokes-Einstein Relation).
Note that in order to obtain reliable microrheology data, there are certain conditions for the tracer particle-sample matrix combination that must be met:
The use of a defined experimental procedure is recommended in order to ensure a robust method is generated for DLS microrheology characterization of a particular complex fluid type. Therefore, the microrheology functionality in the Zetasizer software includes 'pre-measurement' steps to allow evaluation of the above conditions.
The 'pre-measurement' steps within the microrheology application are as follows:
This methodology is aimed at ensuring the important conditions for a particular tracer particle-sample matrix combination are met.
Note that once a particular sample type has been assessed for a suitable probe particle type, size and concentration, then only an autocorrelation function (ACF) measurement needs to be run to extract microrheology data.
At all measurement steps within the microrheology application, user guidance is provided in the software. Expert Advice on data quality is also provided.
Measurement step 1 in the microrheology application is used to assess the suitability of probe particle chemistry to minimize particle-matrix interactions. This is done by measuring:
The zeta potential of the tracer particles in the dispersant (solvent) being used for the microrheology test
The zeta potential of the tracer particles in the dispersant AND sample being used for the microrheology test
The concentration of probe particles used will depend to a great extent on the concentration of the sample in the dispersant (solvent). For the initial measurement of the zeta potential (tracer/solvent only and tracer/sample), the following concentrations are suggested starting points:
The tracer optimization step requires the use of a zeta potential capable cell - there are standard SOPs in the software for:
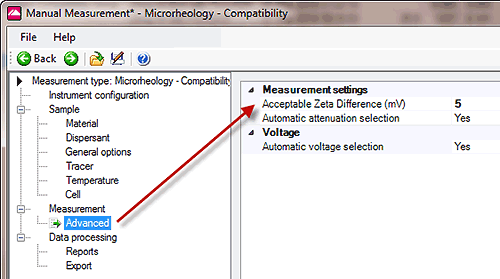
The microrheology software compares the two measured zeta potential results and tests to see if sample measurement is within a set tolerance of the tracer measurement (the 'Acceptable Zeta Ratio'). The software default value for this difference is 5 mV, which can be changed in the advanced settings - Figure 2.
|
The zeta potential of a colloidal particle will change if the surface properties of the particle change e.g. if components of the dispersant matrix, such polymer or protein molecules, adsorb onto the particle surface.
For a DLS microrheology measurement - if the zeta potential of the probes in the presence of the sample is significantly different from the value obtained in the dispersant (solvent), this may indicate strong particle-matrix interactions. Such interactions will inevitably affect the rheological data obtained.
Malvern can offer a limited number of surface chemistries for microrheology tracer particles although other surface chemistries can be made available upon request. The different surface chemistries can be used to test the level of interaction between sample and tracer (using zeta potential measurements as above), such that an optimum tracer particle surface chemistry can be selected for the particular sample type under test.
It is important to note that interactions between the sample and the tracer particles may not be immediately apparent as they can take some time to manifest themselves. Equally, if the sample is not optimally dispersed prior to measurement then the measurement will not be truly representative of the sample. The use of gentle mixing (for example using a sample roller) will help to disperse the tracer particles if required.
An alternative or complimentary approach for evaluating tracer-sample interaction is to measure the rheological behaviour of the sample with and without tracer present on a rotational rheometer. If no interaction is occurring then the rheological response (specifically G') should be similar between the two samples, while a significant difference would suggest interaction. For users with instruments that do not have a zeta capable instrument but have access t o a rheometer this may be the only option for evaluating interaction.
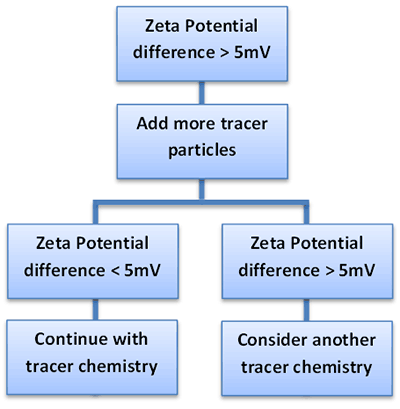
There are two possible causes if the measured zeta potential shows significant differences between the dispersant/tracer and the sample/tracer systems:
The decision making process for choosing an appropriate tracer particle surface chemistry is shown in Figure 2:
|
The second measurement option in the microrheology application is used to assess the level of tracer particle scattering against sample matrix scattering, and use this ratio to predict the tracer concentration required to give dominant scattering.
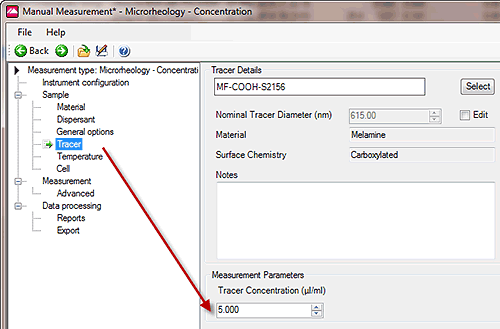
The following guidance is for the suggested concentration of tracer particles to be added to the sample:
|
Once prepared the sample should be transferred to a size capable measurement cell and the measurement started. The measurement is effectively just a size measurement and measures the intensity of the tracer particles at the inputted concentration relative to that of the sample. This relative value is then used to calculate the tracer concentration required to give a relative intensity ratio of 95% (19:1), which is the minimum recommended to ensure the tracer scattering will dominate the measurement. This calculation is made on the basis that for single scattering there should be a linear correlation between concentration and intensity.
This value is displayed in a prompt at the end of the test but also recorded in the results summary table.
Note on filtering of tracer particle suspensions for use in microrheology testing:
For the most reproducible data, it is recommended that the tracer particle suspension is filtered with an appropriately sized filter.
Note that conditions of single scattering are required for DLS microrheology - if the concentration of tracer particles in the sample is too high, the system will become highly turbid. It is therefore important to use a concentration of tracer particles that is just sufficient to mask the sample scattering, and not put in so much that the sample becomes highly turbid (leading to multiple scattering).
A microrheology measurement:
The optimization steps for Tracer Compatibility and Tracer Concentration are optional but are useful tools for assessing whether the tracer chemistry is likely to be suitable for a particular sample and if so what is the minimum concentration that can be used. If this information is already known then the user can proceed to the microrheology measurement.
The only extra information the user requires for the microrheology test is the hydrodynamic size of the tracer particle in the sample solvent or buffer. This step is not included as an optimization step in the microrheology application as it just requires running a standard size measurement of the tracer in the solvent, which can be done through a standard size measurement.
There are two important points to note here:
Under these conditions, the tracer particles probe the bulk material response i.e. the assumption of continuum viscoelasticity holds. If a tracer particle size is small on the microstructural length scale of the sample matrix, then bulk rheological properties will not be recovered from the microrheology measurement.
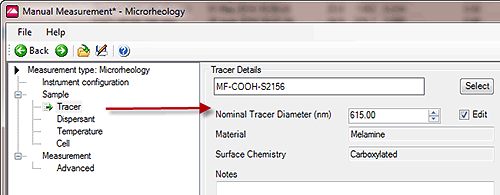
Some tracer particles are already set-up in the software under Tracer Details. These include tracer particles supplied by Malvern and can be 'added to' and edited by the user as required. For Malvern supplied particles the Nominal Tracer Size is usually the size on the bottle which may differ from the hydrodynamic size in the sample solvent. This value can be changed by ticking the Edit box. It will be this value which is used in the microrheology calculation. The tracer window is shown in Figure 4 .
|
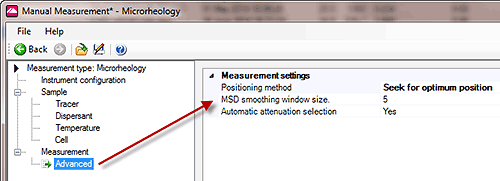
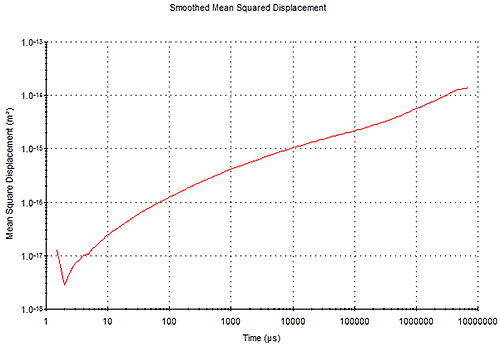
The algorithm used to convert the measured Mean Square Displacement to rheological data requires an accurate estimate of the local gradient at each discrete measurement (or delay) time. To improve the accuracy and quality of this conversion an optional smoothing window can be applied to the the Mean Square Displacement vs Time curve as shown in Figure 7. The default window size is 5 points but this can be edited after the test if required, as shown in Figure 5.
|
The following charts are included in the microrheology workspace:
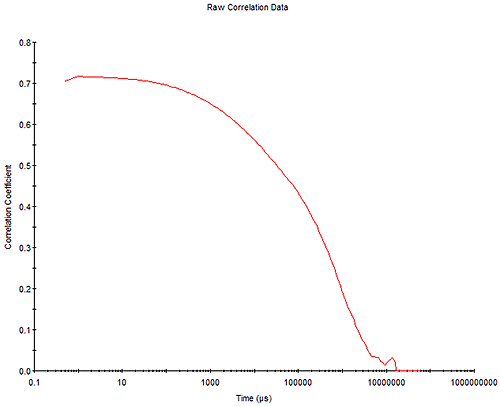
The measured correlation function of the tracer particles in the sample as shown in Figure 6.
This is usually a good measure of data quality with a smooth correlation function and intercept tending to unity preferred. It should be noted, however, that the intercept is also related to the extent of elasticity in the system (degree of relaxation) so more elastic systems will tend to have lower intercepts.
|
The Mean Square Displacement (MSD) is derived from the correlation function, and is a representation of the time dependent movement of the tracer particles within the sample as shown in Figure 7.
|
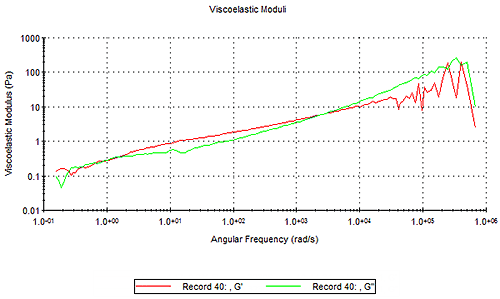
The Moduli tab shows the viscoelastic moduli versus frequency for the sample under test - two sets of data are shown on the chart as shown in Figure 8
The viscous modulus (G") will be dominant at lower frequencies (i.e. longer timescales) and the elastic modulus (G') will be dominant at higher frequencies (i.e. shorter timescales). Where a cross-over between the G' and G" occurs, the frequency of the crossover relates to an important relaxation time of the material. For low viscosity, non-Newtonian materials, the cross-over point is often at a very high frequency, which is inaccessible from inertia-limited mechanical rheometry techniques, but these dynamics can be probed by the extended frequency range of DLS microrheology.
For the types of sample applicable to DLS microrheology - low viscosity and weakly-structured materials such as polymer and biopolymer (protein) solutions - it is reasonable to expect the viscous (loss) modulus G" will dominate for at least most of the measured frequency range (and indeed for very weakly structured materials, the G' component may be very noisy).
|
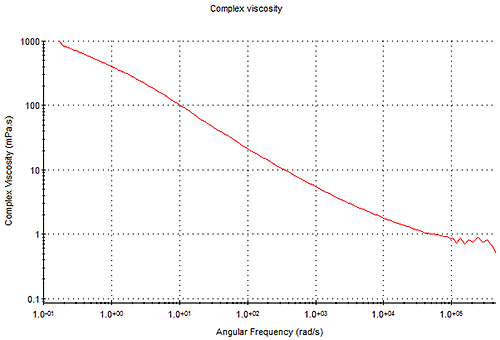
The frequency-dependent complex viscosity, η*, as shown in Figure 9 , can be derived from viscoelastic moduli, and this can be related to shear viscosity using the Cox-Merz rule.
This rule assumes that, for a rheological simple system such as a solution of linear polymers:
This rule is only truly applicable for these rheologically simple systems, and differences between complex viscosity and standard shear viscosity measurements increase with sample complexity, such as the presence of a dispersed phase. As many samples measured using DLS microrheology are rheologically simple then the Cox-Merz relationship is often valid. Analysis of a flow curve can then highlight key criterion for describing the viscosity-angular frequency dependence, particularly for non-Newtonian fluids. These include the following parameters which can be extracted using a suitable model fit (see microrheology utilities)
|
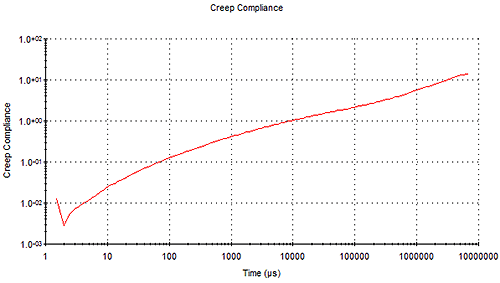
The MSD data is also related to creep compliance (J) of the sample - which is an alternative representation of sample viscoelasticity and is a measure of how far the particle moves for a given applied force, the units being in Pa-1. This can be calculated directly from the MSD and is displayed in the time domain as opposed to the frequency domain for G as shown in Figure 10.
|
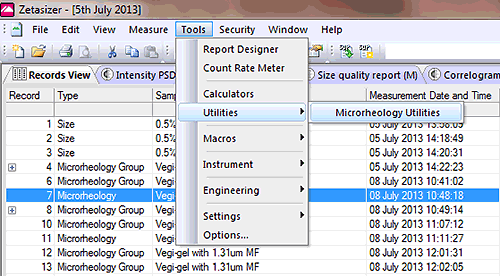
The Zetasizer software has a utilities section for the microrheology suite, which can be accessed via the Tools menu (Figure 11) or from the context menu (right click on a microrheology measurement).
|
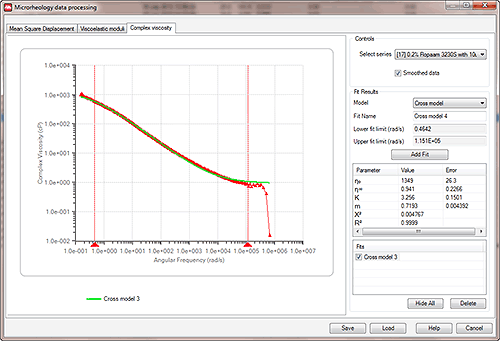
The Microrheology Utilities panel shows three charts - the Mean Square Displacement, the Viscoelastic moduli and the Complex viscosity.
On each page, rheological models are available that can be fitted to the data e.g. Figure 12 shows complex viscosity data that has been analysed using a Cross model.
It is important to note that not all models will be applicable to all datasets. In order to select appropriate areas of data only for subsequent model fitting (i.e. to remove excessively noisy data that can occur at the very shortest timescales), right click and drag the range pointers (the red triangles on the x axis) to the appropriate points on the chart.
|
The microrheology results can be exported either from the File menu (shown in Figure 13) or from the Microrheology Utilities section using the save button. This latter approach is preferred and exports data in a format that can be easily imported in to the rSpace software for further analysis.
|
The Microrheology Utilities have two file options - save as .xml or save as .csv.
The parameters that are exported are as follows:
| Sample Name | Date |
| File Name | Lag time (μs) |
| Time (μs) | Angular Frequency (rad/s) |
| Creep Compliance: Plot against Time | Mean Square Displacement: Plot against Time |
| Channel Values: The Correlogram, plot against Lag time | Complex Viscosity: Plot against angular frequency |
| Shear modulus (Viscous component): Plot against angular frequency | Shear modulus (Elastic component): Elastic component, plot against angular frequency |
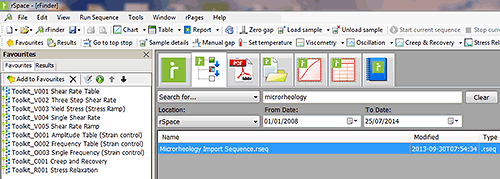
Microrheology data generated on the Zetasizer can be imported into the Kinexus rSpace software using the ‘Microrheology Import Sequence’ available in the rSpace software. This allows data to be combined or compared with rotational rheometry data and further analysis performed. The ‘Microrheology Import Sequence’ can be located using the rFinder search engine by entering the search term “microrheology” as shown in Figure 14. Clicking on the import sequence will prompt the user to select an appropriate csv file and the data will then be imported and displayed in both tabular and graphical form.
|