A quality report has been developed for the Zetasizer Nano range of instruments to simplify the interpretation of the data obtained from a zeta potential measurement. The zeta potential quality report is displayed as default as one of the reports in the zeta potential workspace in software version 4.10 or later.
Several tests are performed on a selected record and a message is displayed in the quality report. This is either 'Results meets quality criteria' in green, or if any of the tests fall outside specified limits, 'Result does not meet quality criteria' in red. This warning is displayed together with advice on how to improve the result.
In addition the Malvern summary report 'Zeta potential (M)' has a result quality parameter. This either displays 'Good' in green, or 'Refer to quality report' in red if any of the quality tests fail.
The Zeta Potential Quality Report incorporates 6 tests on the selected record.
Table 1 is a summary of the tests incorporated and lists descriptions of the tests, the warning message and actions that might remedy it. This technical note uses example results to illustrate the warning messages and provides details of possible actions of how to improve the results.
| Test Number | Test Description | Warning Message | Possible Reasons for Warning Message | Possible Actions |
|---|---|---|---|---|
| 1 | Check the quality of the phase plot data | Phase data poor - signal to noise ratio low | Sample concentration too low | Manually increase number of sub-runs per measurement |
| Increase sample concentration and re-measure | ||||
| Sample concentration too high (sample looks turbid) | Manually increase number of sub-runs per measurement | |||
| Dilute sample and re-measure | ||||
| Use high concentration cell accessory and re-measure | ||||
| High conductivity causing sample/electrode degradation | Ensure that the Monomodal analysis is used | |||
| Manually reduce voltage | ||||
| Measurement duration manually set | Set measurement duration to automatic and re-measure | |||
| Manually increase number of sub-runs per measurement and re-measure | ||||
| 2 | Check the quality of the distribution plot data | Distribution data poor | Sample concentration too low | Manually increase number of sub-runs per measurement |
| Increase sample concentration and re-measure | ||||
| Sample concentration too high (sample looks turbid) | Manually increase number of sub-runs per measurement | |||
| Dilute sample and re-measure | ||||
| Use high concentration cell accessory and re-measure | ||||
| High conductivity causing sample/electrode degradation | Ensure that the Monomodal analysis is used | |||
| Manually reduce voltage | ||||
| Measurement duration manually set | Set measurement duration to automatic and re-measure | |||
| Manually increase number of sub-runs per measurement and re-measure | ||||
| 3 | Check the limits of the zeta potential distribution are within the analyzed range | Increase zeta potential analysis range | Sample has a wide zeta potential distribution | Edit the zeta potential analysis limits and re-analyze |
| High conductivity resulting in an automatic reduction in the applied voltage | Edit the zeta potential analysis limits and re-analyze | |||
| Sample has low dielectric constant or high viscosity | Edit the zeta potential analysis limits and re-analyze | |||
| Mean zeta potential value > +50mV and wall potential >+50mV | If frequency plot is cutting off at 500Hz, manually reduce the voltage to 100V and re-measure | |||
| 4 | Checks that the Monomodal analysis has been used for samples with conductivities greater than 10mS/cm | Suggest use of Monomodal analysis as conductivity is >10mS/cm | High sample conductivity | Manually further reduce voltage and re-measure using General Purpose (fresh sample may be required) |
| Use the Monomodal analysis to try and minimize sample degradation | ||||
| 5 | Check for flare originating from the cell wall | Flare from cell wall - check for bubbles, increase sample concentration | Sample concentration too low | Increase sample concentration and re-measure |
| Bubbles present in the path of the laser beam | Check for air-bubbles, replace and re-measure the sample | |||
| Capillary cell wall contaminated | Try flushing with clean water or dispersant | |||
| Replace the capillary cell | ||||
| 6 | Check if the attenuator used was position 11 | Sample concentration may be inappropriate (too high or low) | Sample concentration too low | Increase sample concentration and re-measure |
| Sample concentration too high (sample looks turbid) | Dilute sample and re-measure | |||
| Use high concentration cell accessory and re-measure | ||||
| Bubbles present in the path of the laser beam | Check for air-bubbles, remove and re-measure the sample | |||
| Cell not inserted correctly into the instrument | Check that the cell is correctly inserted |
Phase data poor - signal to noise ratio low
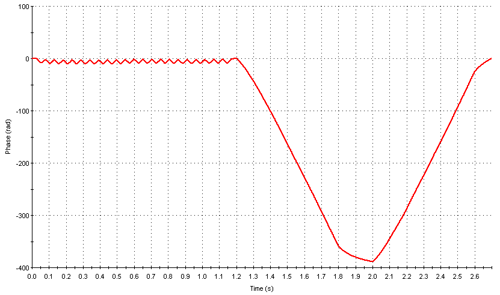
The phase plot shows the difference in phase between the measured beat frequency and the reference frequency as a function of time. A typical phase plot of good quality obtained from a measurement using the General Purpose protocol is shown in figure 1. This plot shows well defined, alternating slopes of the phase difference with time, which result from the fast field reversal (FFR) part of the measurement (up to 1.2 seconds). These slopes are averaged to determine the mean phase difference and hence mean zeta potential. In addition, the slopes of the phase difference during the slow field reversal (SFR) part of the measurement are smooth and well defined.
|
|
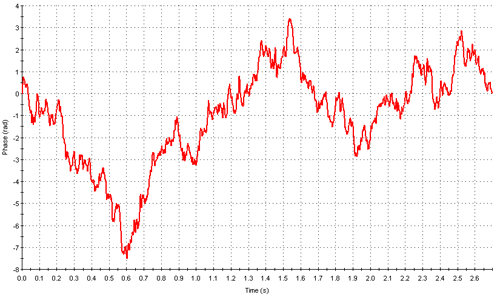
The poor data quality shown may be due to several factors as summarized in Table 1. Firstly, the sample concentration may be too low or too high. The minimum and maximum sample concentrations that can be measured in a Zetasizer Nano will depend on various factors such as the optical properties of the particles, the particle size and the polydispersity of the particle size distribution. The laser beam has to penetrate the sample for scattered light at a forward angle to be detected. Therefore, in general, samples for zeta potential measurements have to be optically clear. If the concentration of the sample becomes too high, then the laser beam will become attenuated by the particles reducing the scattered light that is being detected.
If the sample cannot be diluted, the zeta potential high concentration accessory (ZEN1010) will enable the measurement of higher concentration samples than the standard capillary cell or the dip cell.
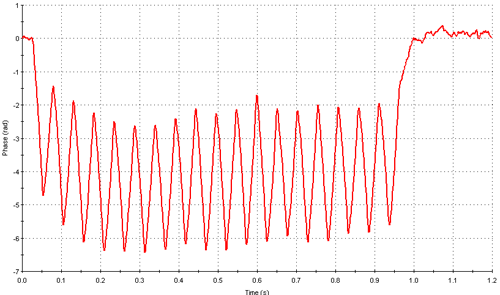
The second reason for poor phase plot data is that the conductivity of the sample may be high causing sample/electrode degradation if the General Purpose measurement protocol has been used. The application of the field for long periods during the SFR part of the measurement can cause Joule heating resulting in sample/electrode degradation. If the measured conductivity is greater than 10mS/cm, it is advisable that the Monomodal analysis is used (Test 4 checks for this). If Monomodal is selected, only the FFR part of the measurement is performed and only a mean zeta potential value is obtained. Figure 3 shows a typical phase plot of good quality obtained from a Monomodal measurement.
|
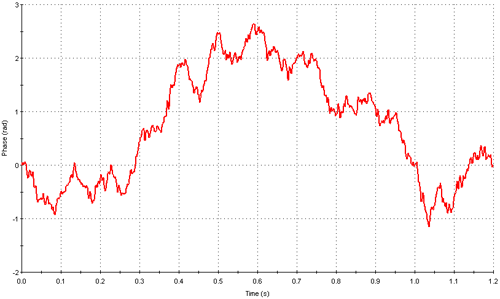
Figure 4 shows a phase plot of poor quality from a Monomodal measurement. Even though the data is noisy, there is discernible phase difference information present in the plot. This can be improved by manually increasing the number of sub runs per measurement.
|
Distribution data poor
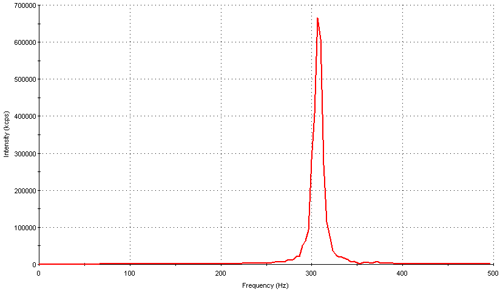
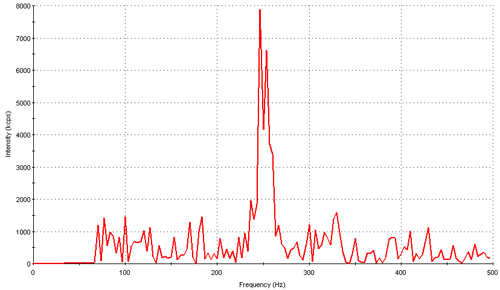
The frequency plot shows the frequency spectrum obtained from the SFR part of the measurement using a Fourier transform analysis. The frequency spectrum is used to determine the electrophoretic mobility distribution and hence zeta potential distribution. Figure 5 shows a typical frequency plot obtained from a good measurement. Conversely, figure 6 is an example of a noisy frequency distribution plot.
|
|
Several factors may be responsible for such poor distribution data and these are analogous to those causing poor phase plots (see Table 1). Firstly, the sample concentration may be inappropriate. If the sample concentration is too low, insufficient scattering may have been detected resulting in poor signal to noise. If the sample is too turbid, attenuation of the laser beam will result in poor signal quality, this may be improved by the use of the high concentration cell accessory (ZEN1010). Concerns regarding the sample concentration are also highlighted by test 6.
If the sample has a high conductivity, the application of the field during the SFR part of the General Purpose measurement may cause sample and/or electrode degradation. It is advisable to use the Monomodal measurement protocol for samples with conductivities greater than 10mS/cm. Note that only a mean zeta potential is obtained with the Monomodal measurement as no distribution analysis is performed.
Increase zeta potential analysis range
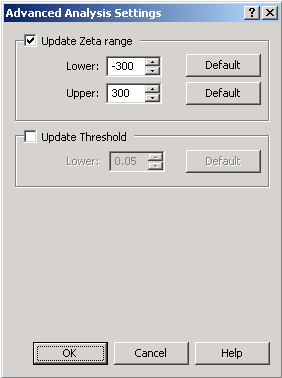
The default zeta potential analysis limits are +150 to -150mV respectively. If the zeta potential distribution obtained from a measurement has data outside these default values, a warning message appears in the Zeta Quality Report. There are several reasons why this might occur. Firstly, the sample may have a naturally wide zeta potential distribution where the limits of the distribution exceed the default settings. To rectify this problem, the record needs to be selected in the Record View and edited (by clicking on Edit, Edit Result). This action brings up the Edit Result window. The Advanced button needs to be clicked on the Zeta Analysis Settings tab. After the Update Zeta Range option has been selected, appropriate Lower or Upper limits need to be entered (figure 7). A new record will be calculated with these new settings implemented and will be displayed in the Record View.
|
The second possible reason for obtaining this warning message is that the measured conductivity of the sample has resulted in an automatic decrease in the applied voltage and subsequent increase in the width. Thirdly, a sample that has either a low dielectric constant and/or a high viscosity can give this warning message.
In each of these cases, where the limits of the distribution are outside the default values, the record can be edited and lower and upper zeta analysis limits can be changed as described above (figure 7).
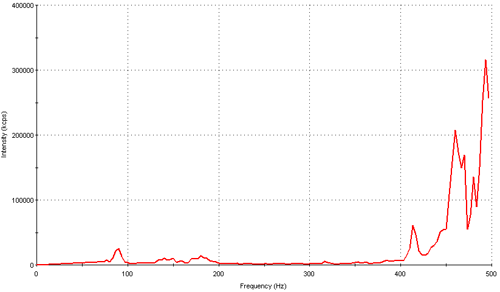
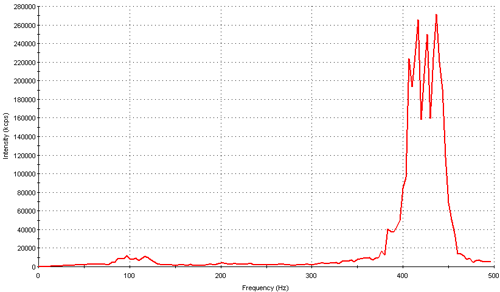
The final reason for this warning message is if both the mean zeta potential value and the wall zeta potential values are greater than +50mV respectively. In this situation, the total frequency shift measured during the SFR part of the General Purpose measurement will be greater than 500Hz (which is the maximum allowed in the analysis). Figure 8 shows a frequency distribution obtained from a measurement of a sample where the mean zeta potential value was +63.4mV and the measured wall zeta potential was +61.1mV. The applied voltage used for this measurement was the default value of 150V. The frequency distribution obtained has been cutoff at the 500Hz limit and has resulted in a warning message appearing in the Zeta Quality Report. The solution to this problem is to re-measure the sample using a lower applied voltage (for example, 100V). Figure 9 is the frequency distribution obtained for the same sample when the applied voltage was reduced to 100V. The limits of the frequency distribution (and hence zeta potential distribution) are no longer cut off.
|
|
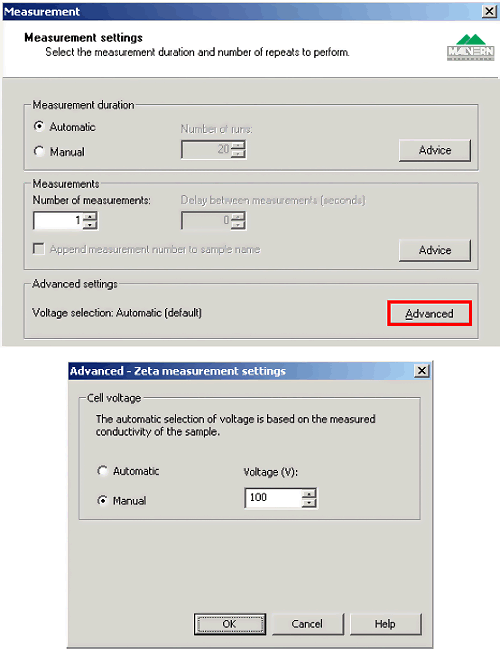
The applied voltage can be manually set by clicking the Advanced button on the Measurement Settings Tab. This will bring up the Advanced Zeta Measurement Settings Tab where the Cell Voltage can be manually set (figure 10).
|
Suggest use of monomodal analysis as conductivity > 10mS/cm
It has already been suggested that for samples with high conductivities, the General Purpose measurement protocol is not recommended. This is because the application of the field for long periods during the SFR part of the General Purpose measurement may cause sample and/or electrode degradation. To try and minimize these detrimental effects, the applied voltage is automatically reduced according to the measured conductivity. Table 2 summarizes the automatic applied voltages based on the measured conductivity. A reduction in the applied voltage will lead to a loss of resolution i.e. an increase in the width of the zeta potential distribution. The usefulness of such broad zeta potential distributions obtained from samples containing high conductivities is open to debate. Therefore, the use of the Monomodal analysis is recommended for such high conductivity samples. Only the FFR part of the measurement is performed and this test highlights this recommendation to the user. Note that only a mean zeta potential value is obtained from the Monomodal analysis.
| Measured Conductivity (mS/cm) | Default Applied Voltage (V) |
|---|---|
| <5 | 150 |
| >5 | 50 |
| >30 | 10 |
Flare from cell wall - check for bubbles, increase sample concentration
In certain circumstances, the laser beam will be scattered by the wall of the cell causing flare. This can manifest itself in a peak being displayed at positive zeta potentials due to the way in which the data is processed. This effect is detected and automatically removed in the software before the analysis is done. The effect of this procedure is that the peak no longer appears in the result. However, this data processing allows for the identification of flare during the measurement and is highlighted to the user by this test.
There are various reasons why flare may be present during the measurement. Firstly, the contribution of flare in the signal may be significant because there is insufficient scattering from the sample due to low concentration. This may also result in poor phase (see Test 1) and distribution plots (see Test 2) and a warning message with Test 6.
Secondly, it might originate from the presence of air bubbles in the path of the laser beam. The cell needs to be removed from the instrument and checked for such bubbles. If present, the bubbles need to be removed and the sample re-measured.
Thirdly, flare may be caused by contamination on the capillary cell wall. It may be possible to remove this contamination by flushing the cell with water or dispersant and re-measuring the sample. If removal of the contaminant is not possible, the cell should be replaced with a new one.
Sample concentration may be inappropriate (Too high or low)
The Zetasizer Nano contains an automatic attenuator that varies the intensity of the laser beam entering the sample and hence varies the intensity of the scattered light being detected. In the mode of operation used in the Nano, the scattered light from the sample is mixed with unscattered laser light (the reference beam). The ratio of the intensity of the reference beam to scattered light is carefully controlled using an attenuator and is set to around 10:1. For samples that do not scatter much light, such as very small particles or samples of low concentration, the amount of scattered light being detected must be increased. The attenuator will therefore automatically allow more light through to the sample. For samples that significantly scatter light, such as large particles or samples at high concentration, the attenuator automatically reduces the amount of light that passes through to the sample. The attenuator in the Zetasizer Nano has 11 positions covering an attenuator range of 100% to 0.0003%.
The scattered light from a sample in a zeta potential measurement is detected at a forward angle in the Zetasizer Nano. Therefore, the laser beam has to penetrate through the sample. If the concentration of the sample is too high, then the laser beam will become attenuated by the particles reducing the scattered light that is being detected. To try and compensate for these effects, the attenuator position in the instrument will be adjusted to give a higher transmission.
At attenuator position of 11 has an attenuation of zero i.e. 100% transmission of the laser beam. Therefore, this test highlights to the user that the sample concentration may be inappropriate i.e. either too low or too high, and may result in poor phase and distribution plots.
Other possible reasons for obtaining a warning message with this test are the presence of air bubbles in the path of the laser beam (this would also result in flare and a warning message from Test 5) or an incorrectly inserted cell into the instrument.