This document provides details on how to use the 21 CFR Part 11 features provided for the Malvern Mastersizer 2000 software (referred to as "the Application" throughout).
It is possible that your company's SOPs specify control of access to the information given in this note. Consequently, this information is not incorporated in the online help or the printed manuals.
This document is intended to be read by Mastersizer 2000 system administrators. Administrators are defined as people responsible for the security and 21 CFR compliance of the instrument. Some knowledge of the Windows™ operating system is assumed and some familiarity with the instrument software is also assumed.
It is assumed that the software has been installed in accordance with the guidance provided by the Software Update Notification document contained on the software CD-ROM and that the 21CFR11 feature key (Part Number CPS0020) has been installed The features described here relate to Mastersizer 2000 v5.00 or higher software. Details of software updates can be found in the Software Update Notification document.
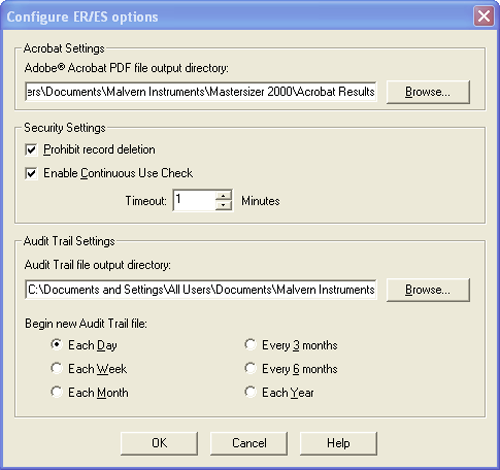
The configuration settings of the Electronic Records and Electronic signatures can be found under the Security-ER/ES Settings menu option. This allows users to configure the options shown in Figure 1. These are described below.
|
The Acrobat Settings allow administrators to configure the use of Adobe Acrobat© if it is to be used as a solution for applying electronic signatures to records.
The PDF file output directory is the location where PDF reports generated by the user will be stored. It is recommended that these reports be held on a centralized file server in order to comply with the 21 CFR Part 11 regulations about data preservation.
It is possible to control an individual user's ability to delete records using the Group Permissions in the security configuration section of the software. However, for strict compliance to 21 CFR Part 11, it is also possible to prevent record deletion for all users by checking the Prohibit Record Deletion prohibition option on the Configure ER/ES options dialogue. When this option is enabled it will override the permissions associated with file deletion within the software's security system.
In order to ensure that the person operating the Mastersizer 2000 system is the person identified by the access control system, it is possible to configure the software to monitor system usage. If the software remains idle for longer than a period specified, the user will be logged out. To enable this feature, check the option on the Configure ER/ES options dialogue box and configure the Timeout period.
The Audit Trail file output directory is the location where the Audit Trail files will be stored. It is recommended that these reports be held on a centralized file server in order to comply with the 21 CFR Part 11 regulations relating to data preservation.
It is possible to control the approximate size of an audit trail file by specifying how often a new file is created. The period depends upon the usage of the Mastersizer 2000 system and the typical number of auditable events that occur in a day. This can only be assessed by the user from experience of using the system. Typical practice is to start a new audit file weekly and observe the number of events audited over that period.
After the specified period has passed, the application will automatically begin a new audit trail file. The new file name will be recorded in the previous file in order to maintain a continuous audit trail.
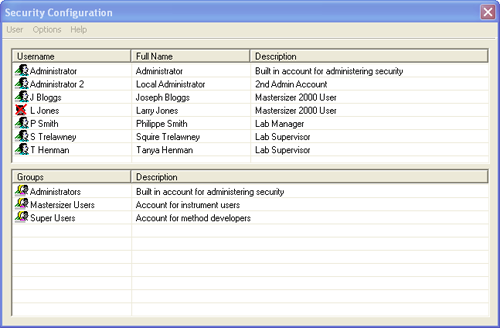
The security configuration dialogue (figure 2) for the security system can be accessed using the Security-Configure Security menu option. This provides a list of the users configured within the security system (top pane) and the groups to which users can be assigned (bottom pane). The Username and Full Name of each user is supplied along with a brief description of the role that user has. For each group, a group description is specified in order to allow Administrators to assess the capabilities of each group.
|
The security system is similar to the Windows™ operating system security and should be familiar to most advanced users.
It is possible to configure the security system in such a way as to prevent any user from logging in to the system. To avoid this situation, make sure that you do the following:
The first user enabled to edit the security settings should be the individual responsible for administering the use of the system. The second user should be a pseudo account. The user name and password for this account should be recorded and stored in a secure but well-known place. This might be in a sealed envelope held in the company safe or with a trusted individual such as the head of the I.T. department. This will permit access to the security system should the other user become unavailable.
The Group Setup process defines a set of access rights that may be granted to users. An access right allows or prohibits use of a specific feature of the software. The access rights available within the Mastersizer software are detailed in Appendix 1.
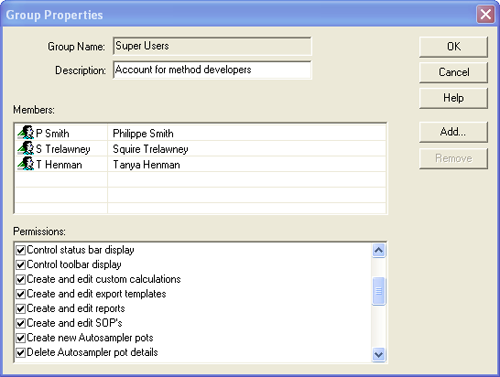
New groups are specified using the User-New Group menu option. Existing groups can be configured by double-clicking on the group name within the Security Configuration window. Both actions cause the Group Properties dialogue box to appear (Figure 3). Within this the following can be configured:
|
i)The Group Name: An alias for the group. This is usually a descriptive name for either a level of access or a job function. Commonly defined groups are Operators, Supervisors and Administrators.
ii) A Description: A more detailed description of the group's capabilities.
iii) Group Members: The users who are members of the group and have the access permissions that the group allows. Users can be added to a group either as part of the user creation process or by clicking on the Add button.
iv) Group Permissions: The list of access permissions conferred by membership of a group. Any user who is a member of the group will be granted access to a software feature if the relevant permission is checked. The permissions available are described in appendix 1.
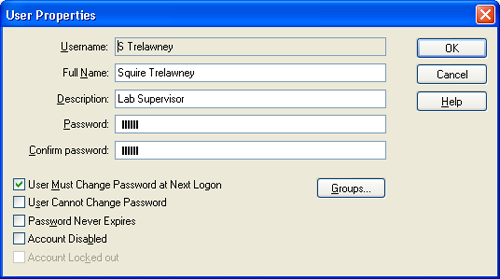
Once suitable groups have been defined, the next step is to add the users to the system. New users are specified using the User-New User menu option. Existing users can be configured by double-clicking on the user name within the Security Configuration window. Both actions cause the User Properties dialogue box to appear (Figure 4). Within this the following can be configured:
|
i) Username: Each user must have a unique user identifier. Any local SOP for username generation should be followed, but a typical practice is to use the initials and surname of a user as the user identifier.
ii) Full Name: This is the full name of the individual and will appear on any reports in order to identify the individual who made a measurement.
iii) Description: This is typically the user's job title or function.
iv) Password: The password field is where you enter the password. For security reasons, the password is not displayed. It will also be noted that the number of asterisks may not necessarily map exactly to the password length. A typical practice to preserve the security of user's passwords when setting up a new user is for the administrator to agree a temporary password with the user (this must not be the user's final password), and check the option to force the user to change this password at the next logon.
v) User must change password at next logon: If this field is checked, users will be asked to change their passwords the next time that they log on to the system. This allows the administrator to set temporary passwords for new users or users who have forgotten their passwords.
vi) User cannot change password: If this box is checked, the user will not be able to change their password unless it is the first time that a user has logged in and the system expects the user to change the password at the next logon. This box should only be checked in special circumstances such as for an administrator account to be used in emergencies.
vii) Password never expires: Checking this box prevents the password expiration setting from applying to this user. This box should only be checked in special circumstances such as for an administrator account to be used in emergencies.
viii) Account disabled: Checking this box prevents the user from logging in to the system. This box should be checked when a user leaves the company or is no longer allowed access to the Mastersizer 2000 system. Under 21 CFR Part 11, user's information must be retained for the full period of record retention. This option allows access to be prevented without removing the user details from the system. If the user icon in the Security Configuration screen (figure 2) has a cross through it, that user's access capability has been disabled.
ix) Account locked out: This box will be enabled and checked if a user has been denied access by the security system. The administrator is able to allow access again by clearing this check box. Lockout will typically happen when a user forgets their password and has made more than the allowed limit of logon attempts (Figure 6). It may also be an indication of an attempt to logon by an unauthorized user. If the user icon in the Security Configuration screen (figure 2) has a padlock next to it, that user's account has been locked out.
Users can be added to groups in one of two ways.
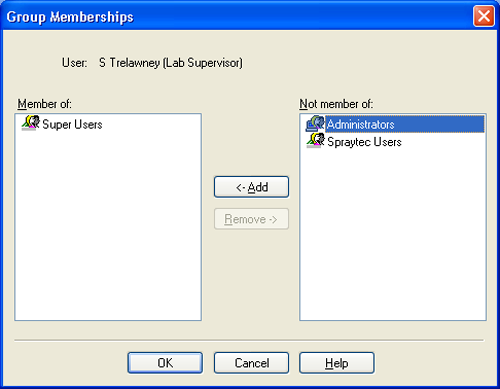
In the User Properties window (Figure 4), pressing the Groups… button will list the groups which the user is a member of and those available for the user to join (Figure 5). Selecting a group from the right-hand list and pressing the Add button will include the user in the selected group. Selecting a group from the left hand list and clicking the Remove button will remove a user from a given group. Where users are members of more than one group it should be noted that if a permission is granted in one group it will override any denial of the same permission in another group. In this way, users have the sum of all the permissions in the groups they belong to.
|
It is also possible to add users to groups from the Group Properties screen (Figure 3) using the Add and Remove buttons. Clicking Add will cause a User Selection dialogue to appear. This will enable users to be multiply selected and added to the group. Removal of a user from a group is achieved by selecting the user within the Members section of Group Properties window and then clicking the Remove button.
Note: It is important to ensure that every user is a member of at least one group in order to allow them access to the Mastersizer 2000 system's capabilities.
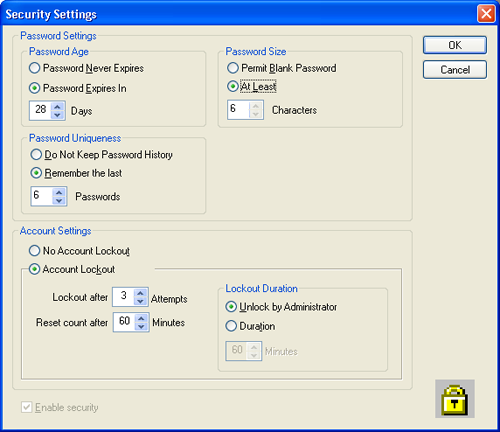
The security settings are accessed from the Options menu within the Security Configuration screen (figure 2). From within this menu, the password storage and account lockout features of the security system can be configured (figure 6). The security system can also be activated. These options are described below.
|
It is possible to force users to change their passwords after a period of time has elapsed. Once the password has expired, users will be prompted to confirm their existing passwords and then specify a new one. In conjunction with the password uniqueness option, this can force users to regularly review their passwords.
This facility should be used with caution. If users are forced to change their passwords too frequently, it is common for them to be forgotten or worse to write them down, thereby defeating the original purpose of the security system.
It is possible to specify the minimum length for a password. As a rule of thumb, the shorter a password is, the easier it is to guess. However, if it is too long, users will not be able to remember their passwords. Six characters is generally a good compromise.
Each time that a user enters a new password, it can be checked against a list of up to 32 previous passwords held in the software in order to ensure that unique passwords are used.
It is recommended that, if this feature is used, the size of the password history should be set between 3 and 6 passwords. Any fewer and users will not have to review their passwords. Any more will force users to choose unfamiliar passwords and will increase the possibility of passwords being written down.
The software is set up to monitor each user's attempts to log in. If the user fails to enter the correct user identifier and password combination, the software will record this and can optionally deny future access to the software.
It is possible to specify the number of unsuccessful attempts allowed (up to 10) before users are locked out. This count will be reset after a specified period of time to allow for genuine users forgetting their passwords.
If users exceed the allowed number of attempts, the software can either lock them out of the system for the specified period or require the intervention of another user with Administrator privileges to unlock their accounts.
The status of a given user's account is displayed on the Security Configuration screen (figure 2). If the username has an icon with a padlock next to it, that user is locked out and the administrator should establish the reason for this before unlocking the account to re-admit a bona-fide user.
By default, the security system is disabled in order to allow free access to the software. The administrator of the system should configure the users and groups before enabling the security system.
Once the users and groups are configured, the security system can be enabled using the check box at the bottom of the Security Settings screen (figure 6).
Enabling the security system is an irreversible process when the software has been set-up in 21 CFR 11 mode. This prevents the system security being switched off again and therefore prevents possible unauthorized access.
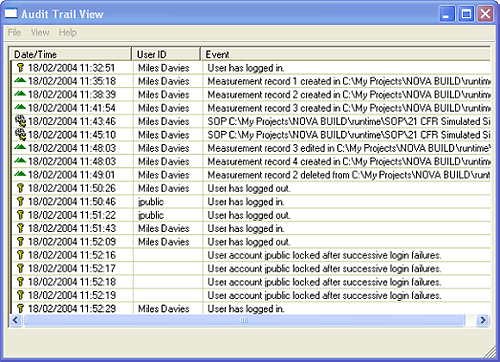
The application software records system events in the system audit trail. This is a record of the application starting and closing, security events such as logging in and out of the system, and file events such as creation and deletion of measurement records and SOPs (Figure 7).
|
Use the File‑Open menu option to view audit trail files other than the currently active trail. Using the File‑Export menu option, it is possible to export the audit trail file contents to an ASCII file for review and printing.
Measurements cannot be edited. If changes are made to a measurement, a new measurement record is created at the end of the file.
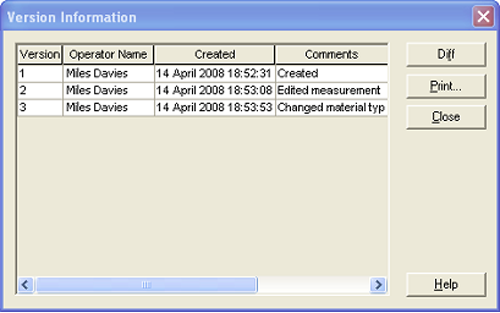
The SOP files contain their own audit history in the form of file versions. Each time that an SOP is edited, a new version is created and the original values are preserved. By comparing the versions of the SOP file, it is possible to see what changes have been made and by whom.
To view the different SOP version, first open an SOP file using the Configure-Existing SOP… menu option. Select the
SOP of interest and then click the Versions… button on the Edit
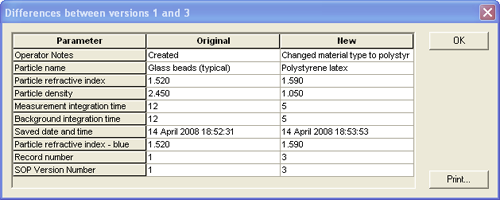
SOP screen. This causes the Version Information screen to appear (figure 8). To see the changes made between two versions of the SOP, select the two revisions which are of interest and press the Diff… button to display the differences screen (figure 9).
|
|
The differences screen displays three columns; the parameter name for each parameter that has changed and the value of that parameter for each of the two versions. The fact that the SOP file has a new revision will also be recorded in the system audit file.
The Mastersizer 2000 software does not directly support electronic signatures. The application can be integrated with the Adobe Acrobat © package, allowing reports to be created as Portable Document Format (otherwise known as PDF). This is achieved using the File-Print PDF menu option.
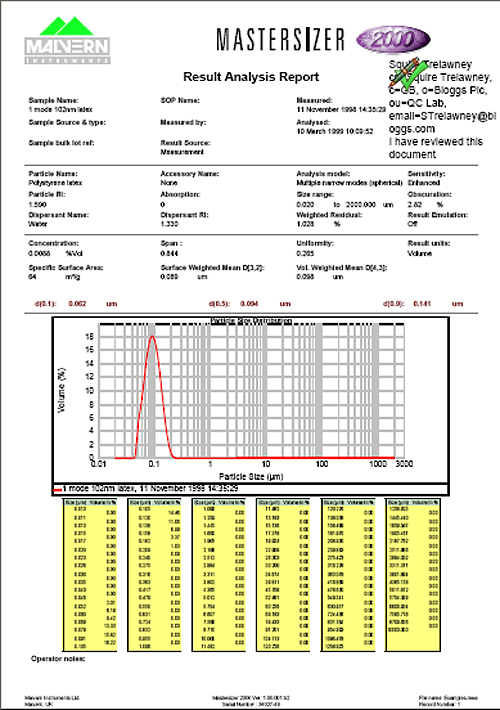
Once reports have been generated, the Adobe Acrobat package can be used to electronically sign them (Figure 10) using either the Adobe Self-Sign technology or a third party digital signature solution such as VeriSign™. The Adobe Acrobat Self-Sign solution is fully compliant with 21 CFR Part 11. Please refer to Adobe's product information for guidance regarding how to use the signature features within Acrobat.
|
| Appendix 1 - Security Permissions The security permissions that can be set for different Groups within the Mastersizer 2000 software are detailed below. | |
|---|---|
| Permission | Description |
Administer user information | Allows a user to change the user settings within the security system. This feature is normally enabled for system administrators only. |
Allow modification of ER/ES settings | Allows a user to change the ER/ES settings. This feature is normally enabled for system administrators only. |
Change the pot order in the Autosampler schedule | Allows a user to change the order in which samples are measured using the autosampler. This feature is normally enabled for system users involved in autosampler measurements. |
Configure communications | Allow a user to modify the serial port to which the instrument is connected. This feature is normally restricted to lab supervisors or other advanced users. |
Configure the alignment pad settings | Allow a user to modify the stored alignment settings for the current measurement cell. This feature is normally be restricted to lab supervisors or other advanced users. |
Control the status bar display | Allow a user to enable or disable the display of the status bar. This feature is normally restricted to lab supervisors or other advanced users. |
Control toolbar display | Allow a user to enable or disable the display of the toolbar. This feature is normally restricted to lab supervisors or other advanced users. |
Create and edit custom calculations | Allow a user to create or edit custom parameters used on reports. This feature is normally restricted to lab supervisors or other advanced users. |
Create and edit export templates | Allow a user to create or edit the templates used for data export. This feature is normally restricted to lab supervisors or other advanced users. |
Create and edit reports | Allow a user to create or edit result report templates. This feature is normally restricted to lab supervisors or other advanced users. |
Create and edit SOP's | Allow a user to create or edit an SOP. This feature is normally restricted to lab supervisors or other advanced users who are involved in method development. |
Create new Autosampler pots | Allows a user to enter new sample details into the Autosampler pot database. This feature is normally enabled for system users involved in autosampler measurements. |
Delete Autosampler pot details | Allows a user to delete sample information stored in the Autosampler pot database. This feature is normally restricted to lab supervisors or other advanced users. |
Delete Results | Allows a user to delete records from within the records view. In a 21 CFR 11 compliant environment, this permission must not be provided to any user. This facility is provided for a mixed environment where some users do not operate under FDA regulations. |
Edit Autosampler pot details | Allows a user to edit sample details in the Autosampler pot database. This feature is normally restricted to lab supervisors or other advanced users. |
Edit grade efficiency settings | Change the parameters used in grade efficiency calculations. This feature is normally restricted to lab supervisors or other advanced users. |
Edit result emulation factors | Change the parameters used within a result emulation. Emulations factors are not really a GxP-approved feature; hence this feature is normally restricted to lab supervisors or other advanced users. |
Edit results | Allow users to edit the results from within the records view in order to change the measurement details and analysis settings. This feature is normally restricted to lab supervisors or other advanced users. |
Edit user sizes | Allow users to edit the user size classes used when displaying results. This feature is normally restricted to lab supervisors or other advanced users. |
Make measurements | Allows users to make measurements. This feature is normally enabled for those users making routine measurements. |
Recycle Autosampler trays | Allows a user to set the status of all the pots on the autosampler tray to 'unmeasured', allowing the pots to be used for new samples. This feature is normally restricted to lab supervisors or other advanced users. |
Select views | Allows users to select different report views. This feature is normally enabled for those users making routine measurements. |
Set reference results | Selects a result as a comparison standard for difference plotting. This feature is normally restricted to lab supervisors or other advanced users, and is only be used if comparisons are to be made against a standard material using difference plots. |
View Audit Trail | Allows a user to view the system audit trail. This feature is normally enabled for system administrators only. |