Wet or liquid dispersion is the most common method of sample dispersion for laser diffraction particle size measurements, being especially suitable for samples containing very fine particles below a few microns in size.
Wet or liquid dispersion is the most common method of sample dispersion for laser diffraction particle size measurements, being especially suitable for samples containing fine particles below a few microns in size. This is due to the significant reduction in particle-to-particle adhesion forces through the process of surface wetting, which enables agglomerated particles to be dispersed with relatively little energy input. However not all samples will be suitable for wet dispersion analysis as it may not be possible or desirable to use a suitable dispersant.
In this application note we will discuss some of the tests that can be carried out to assess the effects of sampling, dispersion and measurement conditions. This should provide you with the information you need to set up a robust method for laser diffraction particle size measurements on wet or liquid dispersed particulate samples.
Achieving reproducible results from any particle characterization technique depends on three factors:
The importance of each of these factors depends on the size of the particles you are measuring: dispersant and dispersion energy are more important for fine particles, whereas sampling is more important for coarse materials. Figure 1 shows the risk factors associated with measurements of fine or coarse particles in wet dispersion

|
How you disperse a sample will depend on what you want to measure. If it is important to quantify the size and extent of agglomeration in a material then you may need to measure it in a partially dispersed state. If the primary particle size is important, then the sample must be completely dispersed to remove any agglomerates. The first step in this process is to choose an appropriate dispersant. For a laser diffraction measurement the dispersant should:
The most commonly used dispersant is water. However, water is not suitable for every sample, whether due to poor wetting or dissolution of the sample. As a general rule of thumb solubility of the sample in the dispersant can be minimised by using a dispersant of opposite polarity to the sample, however this is balanced by the need for particle wetting which becomes more difficult without the aid of surfactants for large differences in polarity. A list of possible dispersants in decreasing order of polarity is shown in Table 1.
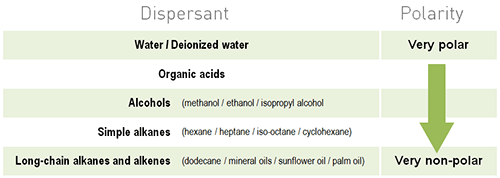
|
There are three main steps to dispersing a powder in a liquid:
When you test a new material it is worth carrying out a beaker test to check how well different dispersants wet the sample. This visual check is quicker than carrying out measurements in a range of different dispersants. Good wetting between particles and dispersant shows a uniform suspension of particles in the liquid, poor wetting may show droplets of liquid on top of the powder, or significant agglomeration and sedimentation.
How well a powder is wetted by a dispersant depends on the surface tension between the particles and the liquid. Wetting can therefore be improved by using a surfactant to reduce the surface tension. Examples of steric and electrosteric surfactants are shown in Table 2.
| Stabilization | Mechanism | Examples |
|---|---|---|
| Steric | Adding a long chain molecule which can adsorb onto the particle surface | Igepal CA-630, Tween 20/80, Span 20/80 |
| Electrosteric | Adding a charged long chain molecule | Anionic : SDS (sodium dodecylfulfate), AOT (sodium bis-2-etheylhexylsulfosuccinate) |
| Cationic : CTAB (cetlytrimethylammonium bromide) |
It is important to control the concentration at which surfactants are used. In general, one to two drops of a surfactant solution (typically no more concentrated than a few percent w/v) is sufficient to improve particle wetting. Too much surfactant can cause foaming, and bubbles which may be interpreted as large particles.
Once you have found an appropriate dispersant to wet the sample, you then need to assess the state of dispersion of the sample in the instrument. We call this process a dispersion titration, which generally involves three steps:
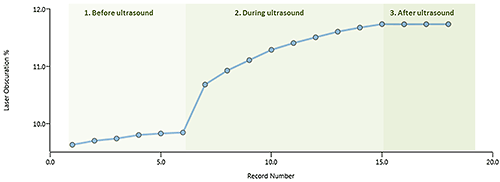
An example of a dispersion titration (in water) is shown in Figure 2. Where stage 1 shows gradual dispersion due to the action of the stirrer, stage 2 shows faster dispersion when the ultrasound is on and stage 3 shows that the results are stable once the ultrasound has been turned off.

|
The dispersion titration shows a change in the particle size distribution consistent with agglomerates being dispersed, as shown in Figure 3. As the sample disperses there should also be an increase in the obscuration (related to the concentration of particles in the system) as each agglomerate is broken up into multiple primary particles, as shown in Figure 4.

|
|
If you are measuring in an organic solvent, then the ultrasound must be applied in steps. For example, apply ultrasound for one minute, and then allow some time for the temperature of the dispersant to stabilize before measuring (otherwise false peaks at large particle sizes may be observed due to temperature gradients in the dispersant). This process should be repeated until no further decrease in size due to ultrasound is observed.
A dispersion titration enables you to determine the power and duration of ultrasound required to disperse the sample to its primary particle size. If the whole dispersion titration is flat, and no reduction in particle size is observed during ultrasound then the sample may be fully dispersed without the use of ultrasound. Conversely if a continual decrease in particle size is observed during ultrasound, e.g. a stable particle size is not reached, then the primary particles may be being broken by the ultrasound. If possible you should verify the state of dispersion of your sample using a microscope or static automated particle imaging instrument by taking an aliquot from the dispersion accessory. Making observations before and after ultrasound should be able to show you if agglomerates have been dispersed or if the particle shape has changed due to breakage.
The particle size should remain stable in stage 3; the expected repeatability for a laser diffraction measurement is discussed in the measurement precision section. If the particle size starts to increase, due to particle re-agglomeration, then an additive may be required to stabilize the dispersion. Additives such as sodium hexametaphoshate, ammonium citrate and sodium pyrophosphate can help to stabilize a suspension by adding charge to the particle surface. Typically additives are used in a concentration of less than 1w/v%.
If you are measuring emulsions then there are two main factors which will aid dispersion. Firstly, the ideal dispersant would contain the same surfactants and stabilisers present in the continuous phase of the product. Secondly, adding the product directly to the tank may cause agglomeration due to dissolution shock so a pre-dispersion may be required to achieve a stable dispersion.
Ultrasound should not be used on emulsions as this may cause further emulsification, and the results would not be representative of the product. It is also important to control the speed of the stirrer in the dispersion unit, as too high a stir speed can cause droplet break up (the effect of stir speed will also be discussed in the measurement conditions section).
The precision of laser diffraction measurements can be assessed using the coefficient of variation, or relative standard deviation, which is defined as:

|
The ISO standard for laser diffraction [1] recommends that the %COV should be less than 2.5% for parameters such as the Dv50, and less than 4% for parameters at the extremes of the distribution such as the Dv10 (3%) and Dv90 (4%). The Mastersizer 3000 has a variability check in its data quality tab to allow you to check the variability of your measurements against the limits set in the ISO standard.

|
Making sure that the sample you put into the instrument is representative of the bulk of your material is important for any particle characterization technique. Sampling becomes the largest possible source of error in the measurement of coarse particles or samples containing a broad range of sizes.
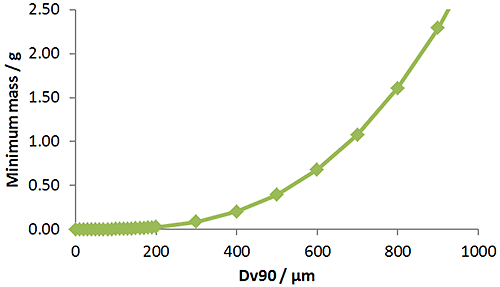
To get a representative result you need to measure a minimum number of particles. For example, to get the Dv90 to within a 4% standard error requires at least 400 particles to be measured. Therefore, for a material with a density of 1.5g/cm3 and a Dv90 of 500μm you would need to measure about 0.5g to get the Dv90 to within a 4% standard error. Therefore, as the size of the particles increases the mass containing sufficient particles increases, and the minimum mass required to achieve reproducible results also increases.
|
Figure 5 shows the minimum mass required to achieve a 5% standard error as a function of particle size. You can test whether your sample mass, or technique, is sufficient by measuring several separate sub samples and assessing the variability of the results.
Getting a robust result from a laser diffraction measurement also depends on setting appropriate measurement conditions. These include:
The appropriate sample concentration for a laser diffraction measurement is a balance between adding enough sample to get a sufficient signal to noise ratio or a representative sample of the bulk material, and not adding too much sample so that the measurement is affected by multiple scattering. The sample concentration in a laser diffraction system is measured by a parameter called obscuration, the percentage loss of laser light through the sample.
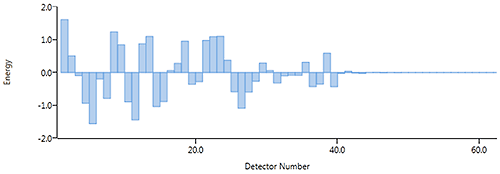
There is a certain amount of noise in any measuring system, in the Mastersizer you can see this as the small but random fluctuations in the data after the background signal has been subtracted, at the add sample stage (see Figure 6).
|
Therefore, enough sample must be added to get a stable scattering signal data above the level of these random fluctuations. The system doesn't require a lot of scattering above the noise level, for example Figure 7 shows the scattering data from a 300nm sample which gives a stable reproducible result at 3% obscuration. Hence, for fine particles, the lower obscuration limit is defined by the noise level in the system.

|
For coarse particles, the lower obscuration limit will be defined by sampling rather than signal to noise ratio. If measurements of several sub samples of a coarse material show high variability try increasing the mass of the sub sample, and therefore the obscuration at which the measurements are made.
The upper limit of obscuration for a laser diffraction measurement is defined by an effect called multiple scattering. The theory used to interpret the scattering data in a diffraction system assumes that the laser light hitting the detector has been scattered by one particle. If the concentration of particles in the cell is too high then there is a higher probability that the laser light has been scattered by more than one particle before hitting the detector. This effect is illustrated in Figure 8

|
These multiple scattering events cause the laser light to be scattered to higher angles. Higher angle scattering is associated with finer particles so multiple scattering causes an underestimate of the particle size. Figure 9 shows the particle size distributions measured for the same sample at obscurations between 5% and 18%. The size distributions measured at 5% and 7% obscuration are very similar, which indicates that there is no multiple scattering in this obscuration range. As the obscuration increases (above 9%) the shape of the distribution changes and more fine particles appear. This suggests that the measurements are affected by multiple scattering at obscurations above 9%, and an appropriate upper obscuration limit for this sample would be 9%.

|
The degree to which your measurements may be affected by multiple scattering or sampling will depend on the particle size of the material that you are measuring. Measurements of fine particles are more likely to be affected by multiple scattering, whereas measurements of coarse particles are more likely to be affected by sampling. Hence, recommended ranges of obscuration, dependent on particle size, are shown in Table 3.
| Particle size | Obscuration range |
|---|---|
| Fine particles | ~ 5 to 10% (less than 5% may be required for <1μm) |
| Coarse particles | 5 to 12% |
| Polydisperse samples | 15 to 20% |
The measurement duration in a wet laser diffraction measurement needs to be long enough to allow a representative sample of the particles in the dispersion unit to circulate through the measurement cell. The required duration will depend on the particle size and the polydispersity of the sample. A fine monodisperse sample only needs a short measurement, whereas coarse particles or broader distributions require longer measurements. If you see high variability over repeat measurements of the same sample (for large particles or broad distributions) then increasing the measurement duration may improve repeatability.

|
Figure 10 shows the particle size distribution of a sample containing material with a broad size range (from 1μm to 700μm). Repeat measurements of this sample have been made using a range of measurement durations from 1 second up to 20 seconds. Figure 11 shows the decrease in relative standard deviation (over the five repeat measurements) for increasing measurement durations. The variability is within the acceptable range, according to the ISO standard [1], for measurement durations above 10s.

|
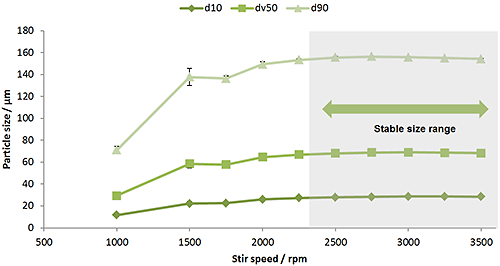
The stirrer in a wet dispersion unit must ensure that the dispersion is homogenous and that the sample passing through the measurement cell is representative. For larger or denser materials you need to carry out a stir speed titration to check that all of the particles in the sample have been suspended. For emulsion samples a stir speed titration can tell you at what speed the droplets begin to be broken by the action of the stirrer.
|
Figure 12 shows the results of a stir speed titration on a copper powder sample. As the stir speed is increased, the measured particle size increases as more of the large particles in the sample are suspended. For this sample a stir speed of above 2500rpm would be recommended as the particle size is stable in this region.
Achieving reproducible results from wet laser diffraction measurements relies on three main factors: taking a representative sample of the bulk material, achieving a stable state of dispersion and setting appropriate measurement conditions.
In this application note we have covered some tests that you can carry out to assess how your samples are affected by these factors. By carrying out some, if not all, of the tests described you will be able to increase your understanding of the materials that you measure, and improve the reproducibility of your particle size results. In addition, having developed a robust method will provide greater assurance in maintenance and transfer of your methods in the future by ensuring that your particle result is not sensitive to small changes in measurement conditions that you could experience over the lifetime of your instrument and method.
[1] ISO13320 (2020). Particle Size Analysis - Laser Diffraction Methods, Part 1: General Principles