What is a particle? This may seem a fairly stupid question to ask! However, it is fundamental to understanding the results which come from various particle size analysis techniques.
This may seem a fairly stupid question to ask! However, it is fundamental in order to understand the results which come from various particle size analysis techniques. Dispersion processes and the shape of materials makes particle size analysis a more complex matter than it first appears.
Imagine that I give you a matchbox and a ruler and ask you to tell me the size of it. You may reply saying that the matchbox is 20 x 10 x 5mm. You cannot correctly say "the matchbox is 20mm" as this is only one aspect of its size. So it is not possible for you to describe the 3-dimensional matchbox with one unique number.
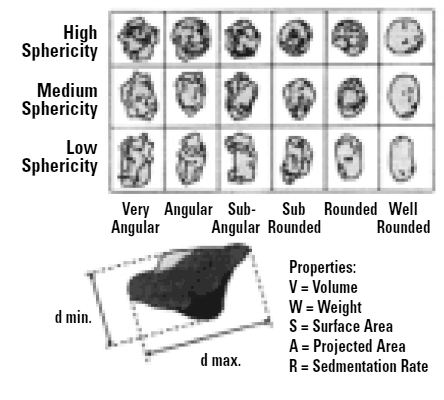
Obviously the situation is more difficult for a complex shape like a grain of sand or a pigment particle in a can of paint. If I am a Q.A. Manager, I will want one number only to describe my particles - I will need to know if the average size has increased or decreased since the last production run, for example. This is the basic problem of particle size analysis - how do we describe a 3-dimensional object with one number only?
|
There is only one shape that can be described by one unique number and that is the sphere. If we say that we have a 50μ sphere, this describes it exactly. We cannot do the same even for a cube where 50μ may refer to an edge or to a diagonal. With our matchbox there are a number of properties of it that can be described by one number. For example the weight is a single unique number as is the volume and surface area. So if we have a technique that measures the weight of the matchbox, we can then convert this weight into the weight of a sphere, remembering that…

|
and calculate one unique number (2r) for the diameter of the sphere of the same weight as our matchbox. This is the equivalent sphere theory. We measure some property of our particle and assume that this refers to a sphere, hence deriving our one unique number (the diameter of this sphere) to describe our particle. This ensures that we do not have to describe our 3-D particles with three or more numbers which although more accurate is inconvenient for management purposes.
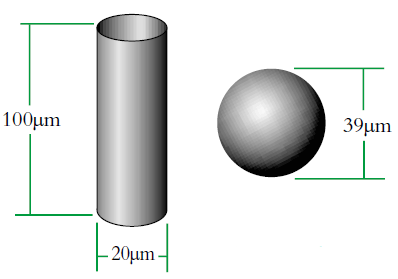
We can see that this can produce some interesting effects depending on the shape of the object and this is illustrated by the example of equivalent spheres of cylinders (Fig. 2). However, if our cylinder changes shape or size then the volume/weight will change and we will at least be able to say that it has got larger/smaller etc. with our equivalent sphere model.
|
Imagine a cylinder of diameter D1 = 20μm (i.e. r=10μm) and height 100μm.
There is a sphere of diameter, D2 which has an equivalent volume to the cylinder. We can calculate this diameter as follows:
Volume of cylinder =

|
Volume of sphere =

|
Where X is equivalent volume radius.

|

|

|
The volume equivalent spherical diameter for a cylinder of 100μm height and 20μm in diameter is around 40μm. The table below indicates equivalent spherical diameters of cylinders of various ratios. The last line may be typical of a large clay particle which is discshaped. It would appear to be 20μm in diameter, but as it is only 0.2μm in thickness, normally we would not consider this dimension. On an instrument which measures the volume of the particle we would get an answer around 5μm. Hence the possibility for disputing answers that different techniques give!
Note also that all these cylinders will appear the same size to a sieve, of say 25μm where it will be stated that "all material is smaller than 25μm". With laser diffraction these 'cylinders' will be seen to be different because they possess different values.
| Size of cylinder | Aspect Ratio | Equivalent Sperical Diameter | |
|---|---|---|---|
| Height | Diam. | ||
| 20 | 20 | 1:1 | 22.9 |
| 40 | 20 | 2:1 | 28.8 |
| 100 | 20 | 5:1 | 39.1 |
| 200 | 20 | 10:1 | 49.3 |
| 400 | 20 | 20:1 | 62.1 |
| 10 | 20 | 0.5:1 | 18.2 |
| 4 | 20 | 0.2:1 | 13.4 |
| 2 | 20 | 0.1:1 | 10.6 |
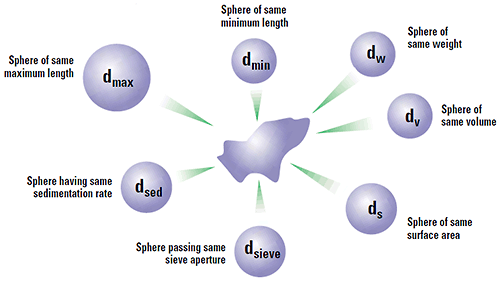
Clearly if we look at our particle under the microscope we are looking at some 2-D projection of it and there are a number of diameters that we can measure to characterise our particle. If we take the maximum length of the particle and use this as our size, then we are really saying that our particle is a sphere of this maximum dimension. Likewise, if we use the minimum diameter or some other quantity like Feret's diameter, this will give us another answer as to the size of our particle. Hence we must be aware that each characterisation technique will measure a different property of a particle (max. length, min. length, volume, surface area etc.) and therefore will give a different answer from another technique which measures an alternative dimension. Figure 3 shows some of the different answers possible for a single grain of sand. Each technique is not wrong - they are all right - it is just that a different property of the particle is being measured. It is like you measure your matchbox with a cm ruler and I measure with an inch ruler (and you measure the length and I measure the width!). Thus we can only seriously compare measurements on a powder by using the same technique.
|
This also means that there cannot be anything like particle size standard for particles like grains of sand. Standards must be spherical for comparison between techniques. However we can have a particle size standard for a particular technique and this should allow comparison between particle sizer instruments which use that technique.
Imagine three spheres of diameters 1,2,3 units. What is the average size of these three spheres? On first reflection we may say 2.00. How have we got this answer? We have summed all the diameters

|
and divided by the number of particles (n=3). This is a number mean, (more accurately a number length mean), because the number of the particles appears in the equation:
Mean diameter =

|
In mathematical terms this is called the D[1,0] because the diameter terms on the top of the equation are to the power of (d1) and there are no diameter terms (d0 ) on the bottom equation. However imagine that I am a catalyst engineer. I will want to compare these spheres on the basis of surface area because the higher the surface area, the higher the activity of the catalyst. The surface area of a sphere is 4πr2. Therefore to compare on basis of surface area we must square the diameters, divide by the number of particles, and take the square root to get back to a mean diameter:

|
This is again a number mean (number-surface mean) because the number of particles appear on the bottom of the equation. We have summed the squares of the diameter so in mathematical terms this is called the D[2,0] - diameter terms squared on the top, no diameter terms on the bottom.
If I am a chemical engineer I will want to compare the spheres on the basis of weight. Remembering that the weight of a sphere is:

|
then we must cube the diameters, divide by the number of particles and take a cube root to get back to a mean diameter:

|
Again this is a number mean (number-volume or number-weight mean) because the number of particles appears in the equation. In mathematical terms this can be seen to be D[3,0].
The main problem with the simple means, D[1,0], D[2,0], D[3,0], is that the number of particles is inherent in the formulae. This gives rise to the need to count large numbers of particles. Particle counting is normally only carried out when the numbers are very low (in the ppm or ppb regions) in applications such as contamination, control and cleanliness. A simple calculation shows that in 1g of silica (density 2.5) then there would be around 760 x 109 particles if they were all 1μm in size.
Hence the concept of Moment Means needs to be introduced and this is usually where some confusion can arise.The two most important moment means are the following:
These means are analagous to moments of inertia and introduce another linear term in diameter (i.e. surface area has a d3 dependence and volume or mass a d4 dependence as below):

|

|
These formulae indicate around which central point of the frequency the (surface area or volume/mass) distribution would rotate. They are, in effect, centres of gravity of the respective distributions. The advantage of this method of calculation is obvious - the formulae do not contain the numbers of particles and therefore calculations of the means and distributions do not require knowledge of the number of particles involved. Laser diffraction initially calculates a distribution based around volume terms and this is why the D[4,3] is reported in a prominent manner.
If we use an electron microscope to measure our particles it is likely that we will measure the diameters with a graticule, add them up and divide by the number of particles to get a mean result. We can see that we are generating the D[1,0] number-length mean by this technique. If we have access to some form of image analysis then the area of each particle is measured and divided by the number of particles - the D[2,0] is generated. If we have a technique like electrozone sensing, we will measure the volume of each particle and divide by the number of particles - a D[3,0] is generated.
Laser diffraction can generate the D[4,3] or equivalent volume mean. This is identical to the weight equivalent mean if the density is constant.
So each technique is liable to generate a different mean diameter as well as measuring different properties of our particle. No wonder people get confused! There are also an infinite number of "right" answers. Imagine 3 spheres with diameters 1,2,3 units:

|

|

|

|

|

|

|

|
| Size(cm) | Number ofObjects | % byNumber | % byMass |
|---|---|---|---|
| 10-1000 | 7000 | 0.2 | 99.96 |
| 1-10 | 17500 | 0.5 | 0.03 |
| 0.1-1.0 | 3500000 | 99.3 | 0.01 |
| Total | 3524500 | 100.00 | 100.00 |
The above example is adapted from an article in New Scientist (13 October 1991). There are a large number of man-made objects orbiting the earth in space and scientists track them regularly. Scientists have also classified them in groups on the basis of their size.
If we examine the third column above we would conclude (correctly) that 99.3% of all particles are incredibly small. This is evaluating the data on a NUMBER basis. However, if we examine the fourth column we would conclude (correctly) that virtually all the objects are between 10 - 1000cms. This is where all the MASS of the object is. Note that the NUMBER and MASS distribution are very different and we would draw different conclusions depending on which distributions we use.
Again neither distribution is incorrect. The data are just being examined in different ways. If we were making a space suit, for example, we could say that it is easy to avoid the 7000 large objects and this takes care of 99.96% of all cases. However, what is more important with a space suit is the protection against small particles which are 99.3% by number!
If we take a calculator and calculate the means of the above distributions we find that the number mean is about 1.6cm and the mass mean about 500cm - again very different.
If we are measuring our particles on an electron microscope we know, from an earlier section (Different techniques give different means.) that we are calculating the D[1,0] or the number-length mean size. If what we really require is the mass or volume mean size we have to convert our number mean to a mass mean. Mathematically, this is easily feasible, but let us examine the consequences of such a conversion.
Imagine that our electron measurement technique is subject to an error of ±3% on the mean size. When we convert the number mean size to a mass mean size then as the mass mean is a cubic function of the diameter then our errors will be cubed or ±27% variation on the final result.
However, if we are calculating the mass or volume distribution as we do with laser diffraction then the situation is different. For a stable sample measured under recirculating conditions in liquid suspension, we should be able to generate a volume mean reproducibility of ±0.5%. If now we convert this volume mean to a number mean the error or the number mean is the cube root of 0.5% or less than 1.0%!
In practice this means that if we are using an electron microscope and what we really want is a volume or mass distribution, the effect of ignoring or missing one 10μ particle is the same as ignoring or missing one thousand 1μ particles.Thus we must be aware of the great dangers of interconversion.
On the Malvern Sizers both the DOS™ and Windows™ software will calculate other derived diameters but we must be very careful of how we interpret these derived diameters. Different means can be converted to each other by means of the following equations (Hatch-Choate transformation) (Ref.7):

|

|

|

|

|

|

|

|

|

|
We have seen that the Malvern laser diffraction technique generates a volume distribution for the analysed light energy data. (Note that with Fraunhofer analysis, the projected area distribution is assumed). This volume distribution can be converted to any number or length diameter as shown above.
However, in any analysis technique, we must be aware of the consequences of such a conversion (see previous section "Interconversion between number, length and volume/mass means.") and also which mean diameter is actually measured by the equipment and which diameters are really calculated or derived from that first measured diameter.
Other techniques will generate other diameters from some measured diameters. For example, a microscope will measure the D[1,0] and will/may derive other diameters from this.
We can place more faith in the measured diameter than we can on the derived diameters. In fact, in some instances it can be very dangerous to rely on the derived property. For example, the Malvern analysis table gives us a specific surface area in m2/cc or m2/gm. We must not take this value too literally - in fact, if what we really want is the specific surface area of our material we really should use a surface area specific technique e.g. B.E.T. or mercury porosimetry.
Remembering that each different technique measures a different property (or size) of our particle and that we may use the data in a number of different ways to get a different mean result (D[4,3], D[3,2] etc.), then what number should we use? Let's take a simple example of two spheres of diameters 1 and 10 units. Imagine that we are making gold. If we calculate the simple number mean diameter this will give us:

|
So we would assume that the average size of the particles in the system is 5.50 units. However, we must remember that if we are making gold we are interested in the weight of our material.
For example, if we have a process stream we are not interested that there are 3.5 million particles in it, we are more interested that there is 1kg or 2kg of gold.
Remembering that the mass mean is a cubic function of diameter, we would see that the sphere of diameter 1 unit has a mass of 1 unit and the sphere of diameter 10 units has a mass of 103 = 1000 units.
That is, the larger sphere makes up 1000/1001 parts of the total mass of the system. If we are making gold then we can throw away the sphere of 1 unit because we will be losing less than 0.1% of the total mass of the system. So the number mean does not accurately reflect where the mass of the system lies. This is where the D[4,3] is much more useful.
In our two sphere example the mass or volume moment mean would be calculated as follows:

|
This value shows us more where the mass of the system lies and is of more value to chemical process engineers.
However, let us imagine that we are in a clean room making wafers of silicon or gallium arsenide. Here, if one particle lands on our wafer it will tend to produce a defect. In this instance the number or concentration of the particles is very important because 1 particle = 1 defect. We would want to use a technique that directly measures the number of particles or gives us the concentration of particles. In essence this is the difference between particle counting and particle sizing. With counting we will record each particle and count it - the size is less important and we may only require a limited number of size classes (say 8). With sizing the absolute number of particles is less relevant than the sizes or the size distribution of the particles and we may require more size bands.
For a metered dose inhaler for asthma sufferers then both the concentration of drug and its particle size distribution is important.
It is important to define these three terms as they are so often misused in both statistics and particle size analysis:
This is some arithmetic average of the data. There are a number of means that can be calculated for particles (see section D[4,3] etc.).
This is the value of the particle size which divides the population exactly into two equal halves i.e. there is 50% of the distribution above this value and 50% below.
This is the most common value of the frequency distribution i.e. the highest point of the frequency curve.
|
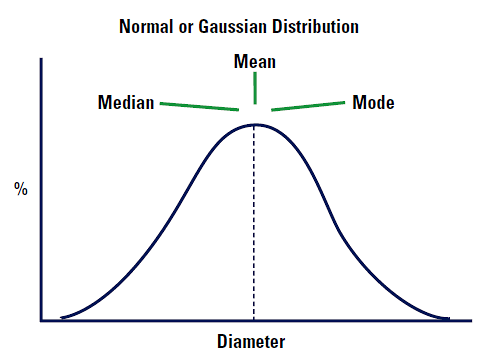
Imagine that our distribution is a Normal or Gaussian distribution. The mean, median and mode will lie in exactly the same positions. See Figure 4.
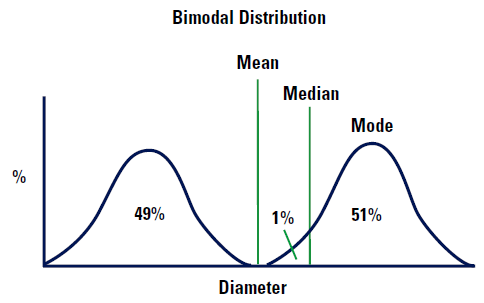
However, imagine that our distribution is bimodal as shown in Figure 5.
|
The mean diameter will be almost exactly between the two distributions as shown. Note there are no particles which are this mean size! The median diameter will lie 1% into the higher of the two distributions because this is the point which divides the distribution exactly into two. The mode will lie at the top of the higher curve because this is the most common value of the diameter (only just!).
This example illustrates that there is no reason which the mean, median and mode should be identical or even similar, it depends on the symmetry of the distribution.
Note that in the Malvern analysis table:
From our earlier sections, we have seen that each measurement technique produces a different answer because it is measuring a different dimension of our particle. We will now discuss some of the relative advantages and disadvantages of the main different methods employed.
This is an extremely old technique but has the advantage that it is cheap and is readily usable for large particles such as are found in mining. Terence Allen (Ref. 2) discussed the difficulties of reproducible sieving but the main disadvantages to many users are the following:
This has been the traditional method of measurement in the paint and ceramics industry and gives seductively low answers! The applicable range is 2-50 microns (Ref. 1 & 2) despite what the manufacturers may claim.
The principle of measurement is based on the Stokes' Law equation:

|
Equipment can be as simple as the Andreason pipette or more complicated involving the use of centrifuges or X-rays.
Examination of this equation will indicate one or two potential pitfalls. The density of the material is needed, hence the method is no good for emulsions where the material does not settle, or very dense materials which settle quickly. The end result is a Stokes diameter (DST) which is not the same as a weight diameter, D[4,3], and is simply a comparison of the particle's settling rate to a sphere settling at the same rate. The viscosity term in the denominator indicates that we will need to control temperatures very accurately - a 1°C change in temperature will produce a 2% change in viscosity.
With the equation it is relatively easy to calculate settling times. It can be shown that a one micron particle of SiO2 (ρ = 2.5) will take 3.5 hours to settle 1cm under gravity in water at 20°C. Measurements are therefore extremely slow and repeat measurements tedious. Hence the move to increase g and attempt to remedy the situation.
The disadvantages of increasing 'g' are discussed in (Ref. 3). More specific criticisms of the sedimentation technique are to be found in (Ref. 2).
Stokes' Law is only valid for spheres which possess the unique feature of being the most compact shape for the volume or surface area they possess. Hence more irregularly shaped 'normal' particles will possess more surface area than the sphere and will therefore fall more slowly because of the increased drag than their equivalent spherical diameters.
| Displacement in 1.0 second (μm) | ||||||
|---|---|---|---|---|---|---|
| In air at 70°F (1atm) | In water at 70°F | In water at 70°F | ||||
| Particle diameter (µm) | Due to Brownian movement* | Due to Gravitational settling+ | Due to Brownian movement* | Due to Gravitational settling+ | Y | k=100Y(%) |
| 0.10 | 29.4 | 1.73 | 2.36 | 0.005 | 31.1 | 96.9 |
| 0.25 | 14.2 | 6.3 | 1.49 | 0.0346 | 3.15 | 75.9 |
| 0.50 | 8.92 | 19.9 | 1.052 | 0.1384 | 0.556 | 35.7 |
| 1.0 | 5.91 | 69.6 | 0.745 | 0.554 | 0.0983 | 5.0 |
| 2.5 | 3.58 | 400 | 0.334 | 13.84 | 0.00995 | 1.0 |
| 10.0 | 1.75 | 1550 | 0.236 | 55.4 | 0.00031 | 0.03 |
*Mean displacement given by equation (7.20)
+Distance settled by a sphere of density 2000kgm-3, including Cunningham's correction.
Y is defined in equation (7.23) (Taken from Reference 2 p 259)
For objects like kaolins which are disc-shaped this effect is even more accentuated and large deviations from reality are to be expected.
Furthermore, with small particles there are two competing processes - gravitational settling and Brownian motion. Stokes' Law only applies to gravitational settling. The table at the top of this page shows a comparison between the two competing processes. It will be seen that very large errors (approx. 20%) will result if sedimentation is used for particles under 2μm in size and the errors will be in excess of 100% for 0.5μm particles.
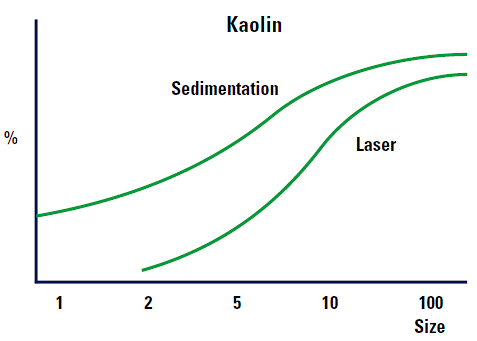
The sedimentation technique gives an answer smaller than reality and this is why some manufacturers deceive themselves. In summary the main disadvantages of the technique for pigment users are the following:
Figure 6 shows the expected differences between a sedimentation and laser diffraction results.
|
This technique was developed in the mid 1950's for sizing blood cells
which are virtually monomodal suspension in a dilute electrolyte.
The principle of operation is very simple. A glass vessel has a hole or orifice in it. Dilute suspension is made to flow through this orifice and a voltage applied across it. As particles flow through the orifice the capacitance alters and this is indicated by a voltage pulse or spike. In older instruments the peak height was measured and related to a peak height of a standard latex. Hence the method is not an absolute one but is of a comparative nature. Problems of particle orientation through the beam can be corrected for by measuring the area under the peak rather than the peak height. For blood cells the technique is unsurpassed and the method is capable of giving both a number count and volume distribution. For real, industrial materials such as pigments there are a number of fundamental drawbacks:
So, in summary this technique is excellent for blood cells but of a more dubious nature for many industrial materials.
This is an excellent technique as it allows one to directly look at the particles in question. So the shape of the particles can be seen and it can also be used to judge whether good dispersion has been achieved or whether agglomeration is present in the system. The method is relatively cheap and for some microscope systems it is possible to use image analysis to obtain lists of numbers (usually to 6 or 8 places of decimals, well beyond the resolution of the technique!).
It is interesting to note that 1g of 10μm particles (density 2.5) contains 760 x 106 particles - all these can never be examined individually by microscopy.
However, it is not suitable as a quality or production control technique beyond a simple judgement of the type indicated above. Relatively few particles are examined and there is the real danger of unrepresentative sampling. Furthermore, if a weight distribution is measured the errors are magnified - missing or ignoring one 10μm particle has the same effect as ignoring one thousand 1μm particles.
Electron microscopy has elaborate sample preparation and is slow. With manual microscopy few particles are examined (maybe 2000 in a day with a good operator) and there is rapid operator fatigue. Again there is the problem of "which dimension do we measure?" Hence there can be large operator to operator variability on the same sample. In combination with diffraction microscopy becomes a very valuable aid to the characterization of particles.
This is more correctly called Low Angle Laser Light Scattering (LALLS). This method has become the preferred standard in many industries for characterization and quality control. The applicable range according to ISO13320 is 0.1 - 3000μm. Instrumentation has been developed in this field over the last twenty years or so. The method relies on the fact that diffraction angle is inversely proportional to particle size. Instruments consist of:
Older instruments and some existing instruments rely only on the Fraunhofer approximation which assumes:
These assumptions are never correct for many materials and for small material they can give rise to errors approaching 30% especially when the relative refractive index of the material and medium is close to unity. When the particle size approaches the wavelength of light the scattering becomes a complex function with maxima and minima present. The latest instruments (e.g. Mastersizer 2000, Malvern Instruments) use the full Mie theory which completely solves the equations for interaction of light with matter. This allows completely accurate results over a large size range (0.02 -2000μm typically). The Mie theory assumes the volume of the particle as opposed to Fraunhofer which is a projected area prediction.
The "penalty" for this complete accuracy is that the refractive indices for the material and medium need to be known and the absorption part of the refractive index known or guessed. However, for the majority of users this will present no problems as these values are either generally known or can be measured.
Laser diffraction gives the end-user the following advantages:
1. Paint and Surface coatings - theory and practice; Ed. R. Lambourne Ellis Horwood Ltd. 1993. ISBN 0-13-030974-5PGk
2. Particle Size Measurement;T. Allen, Chapman & Hall. 4th Edition, 1992. ISBN 04123570
3. G.J.J.Beckers, H.J.Veringa; Powder Technology 60 (1989) p245-248.
4. J. Ranucci Pharmaceutical Technology; October 1992 pp 108-114.
5. G. Hind; Manufacturing Chemist August 1990 pp 28-30.
6. M.W.Wedd; ILASS-Europe 8th Annual conference, Koninklijke/Shell Laboratorium, Amsterdam 30 September -2nd October, 1992.
7. T. Hatch & S.P Choate. J. Franklin Inst. 207 pp 369-387 (1929).