Particle size defines the performance of a wide range of different products, including cement, paints, inks, metal powders, cosmetics, foods and drinks. Measuring relevant particle size data is therefore essential in many industries, with laser diffraction usually the technique of choice. Fast, highly automated and suitable for measurement across a broad size range, 0.01 to 3500 microns, modern laser diffraction systems have reduced particle sizing to a matter of sample loading and push button operation, providing that a suitable method is in place.
Particle size defines the performance of a wide range of different products, including cement, paints, inks, metal powders, cosmetics, foods and drinks. Measuring relevant particle size data is therefore essential in many industries, with laser diffraction usually the technique of choice. Fast, highly automated and suitable for measurement across a broad size range, 0.01 to 3500 µm, modern laser diffraction systems have reduced particle sizing to a matter of sample loading and push button operation, providing that a suitable method is in place.
In this whitepaper we provide some helpful tips on how to develop a robust method that will deliver reliable and reproducible data, efficiently, every time it is used. ISO13320 (2009) [1], the standard for laser diffraction places considerable emphasis on the importance of method development, arguably ‘the last expert task’ associated with laser diffraction, and there is a wealth of helpful information in the public domain. Here we focus on what you really need to know to develop a new method, to troubleshoot if things go wrong, and the tools that can be helpful.
Sampling, the first step in any analysis, is now the greatest potential source of error for a laser diffraction measurement. Exerting control at this stage is essential to measure representative data.
Obtaining a representative sample from a larger bulk is a key challenge with any laboratory-based particle characterization technique. With modern laser diffraction particle size analyzers sampling is now the greatest potential source of error, especially when measuring large particles and/or when the specification is based on size parameters close to the extremes of the distribution. This is because the technique is volume-based and consequently extremely sensitive to small changes in the amount of coarse particles within a sample.
The effect of sampling on reproducibility increases with particle size and with the width of the size distribution, as the volume of sample required to ensure representative sampling of the coarse particle fraction increases. For this reason, it can become necessary to measure a relatively large sample (often greater than 1-2 g) in order to ensure reproducible results. Further detailed discussion of sampling, a topic in its own right, is beyond the scope of this paper but Sampling for particle size analysis [2] is a great source of information for those requiring more detail.
Sample preparation is minimal for laser diffraction. Carefully considering the nature of your sample and the information required will lead you to the optimal dispersion method.
Laser diffraction is suitable for the analysis of a wide array of different sample types, and requires relatively little by way of sample preparation. However, it is essential to consider the need for sample dispersion, tailoring it to the sample being handled and informational requirements.
The primary choice is between wet or dry dispersion, but before choosing either it is important to consider the goal of any dispersion procedure. Do you want to measure the particle size of material as it is in the process or product, even if this is an agglomerated state? Or, do you need to know primary particle size – which may be more relevant to, for example, product stability or reactivity? If primary particle size is important, then the sample must be completely dispersed, without causing particle damage, ahead of measurement.
Factors that influence the choice between wet and dry dispersion include the natural state of the sample, the ease with which it can be dispersed and the volume of sample to be measured.
Wet dispersion is most suitable for samples that are:
However, dry measurement is popular because it can be more:
A pressure titration identifies an air pressure, or ideally an air pressure range, that completely disperses the sample without causing particle damage.
In the majority of laser diffraction systems dispersion is achieved by accelerating the powder sample through a venturi using a controlled flowrate of compressed air. For any given venturi design, the amount of energy available to disperse the sample depends on the pressure of the compressed air. The challenge is to apply sufficient energy to deagglomerate the sample, without causing primary particle damage. Measuring size distribution as a function of air pressure – conducting a pressure titration - identifies optimal conditions.
Generally particle size decreases with increasing air pressure, to a stable value where all agglomerates are dispersed. However, particle size can also decrease due to particle attrition. Comparing the results of a pressure titration to those obtained with a well dispersed wet measurement identifies the pressure at which the agglomerates are dispersed but the primary particles are not being broken. If dispersion and break-up occur simultaneously, which does happen with certain types of fragile material, then dry dispersion is not feasible unless an alternative disperser is available.
Figure 1 shows pressure titration data measured using the two different venturi designs available for the Aero S, the dry dispersion engine for the Mastersizer 3000. One is the standard disperser, the other a high energy alternative. The standard design provides sufficient dispersion for the majority of materials but certain highly agglomerated, robust samples call for the more aggressive action of the alternative design which promotes particle-to-wall collisions.
Comparing the titration results with those measured using a completely dispersed (wet) sample suggests that either disperser can produce the correct particle size distribution, provided that an appropriate air pressure is selected. This raises the question of whether both dispersers are equally suitable.
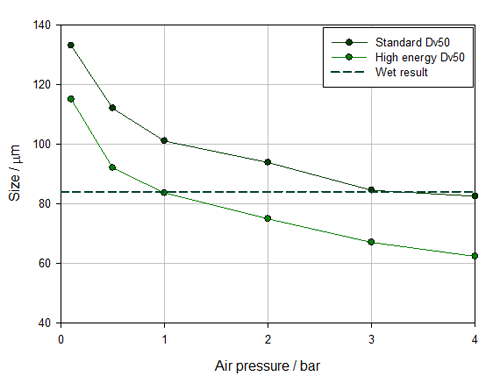
Figure 1: Comparing pressure titration data for a standard and high energy venturi shows that the standard, less energetic design offers more robust measurement with a working pressure envelope that extends from 3 to 4 bar
Closer examination of how Dv50 changes as a function of applied air pressure (see figure 1) reveals the standard venturi to be the better choice. With the high energy design, the results match with wet measurement at 1 bar, but any variation in pressure to either side of that figure, produces a mismatch between dry and wet data, with sample milling occurring at higher pressures. This suggests that the measurement result will be very sensitive to minor variations in air pressure, making the method inherently unstable. In contrast, with the standard venturi, particle size is constant at air pressures across the range 3 to 4 bar meaning that some variability in air pressure can be comfortably accommodated without impacting the measured data for this relatively fragile powder.
Tools that help: Measurement ManagerMeasurement Manager is a powerful feature of the Mastersizer software that provides real-time feedback as to the impact of a change on measured particle size data. It makes pressure titration, obscuration titrations and other experiments designed to identify optimal measurement conditions, fast and highly effective. |
The latest laser diffraction systems, exemplified by the Mastersizer 3000, offer multiple dispersion configuration options that are easily interchangeable and which streamline the use of different geometries to allow users to exploit the merits of alternative set-ups for different materials. By simultaneously enabling precise control of powder feed rate and the pressure of the compressed air, such systems enable the manipulation of dispersion to achieve robust dry measurement for a broad range of sample types.
Achieving reproducible results from a wet measurement depends on:
For successful laser diffraction measurement, choose a dispersant that:
The most common choice is water. However, water is not suitable for every sample, and may, for example, cause poor wetting or dissolution. A list of possible dispersants in decreasing order of polarity is shown in Table 1.
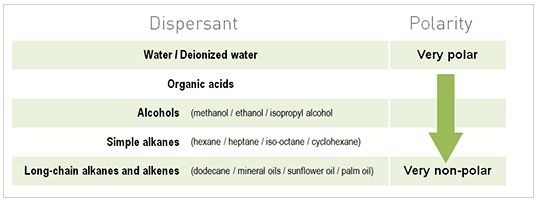
Table 1: Polarity plays an important role in determining dispersant suitability – less polar options may be more suitable for hydrophopbic particles
Mixing sample and dispersant in a beaker and observing the resulting suspension is a good way of checking wettability, a crucial feature. Good wetting produces a uniform suspension; powder floating on top of the liquid, or significant agglomeration and sedimentation are evidence of poor wetting. Since wetting characteristics depend on the surface tension between the particles and the liquid they can be improved by using a surfactant. However, too much surfactant can cause foaming and bubbles which may be interpreted as large particles. Additives that alter pH may also usefully improve dispersion.
For emulsions it is often best to measure without dilution, if at all possible. When dilution is required then choosing a diluent that is as close in nature as possible to the continuous phase will help to reduce the risk of dilution shock, which directly impacts droplet size and consequently measured data.
With wet dispersion the sample is typically made up in a dispersion cell, which forms a feed vessel for the analyzer. Maintaining the sample in a stable, dispersed state is essential for robust measurement with energy typically applied to the sample by:
Tuning these three inputs ensures repeatable, stable dispersion without primary particle break-up.
As highlighted by ISO 13320:2009 particle imaging can be a useful method for detecting agglomerates, making it a natural partner for laser diffraction. Automated imaging provides the complementary benefits of visual assessment and access to particle shape information that, in dispersion assessment, make it easy to distinguish agglomerates from primary particles. Imaging therefore allows users to check whether or not dispersion mechanisms and the overall method are operating as required.
Tools that help: HydroSightThe Hydro Sight accessory for the Mastersizer 3000 uses lens-less technology (patent pending) to capture images and video of the dispersion process, in real-time, with a single click. By measuring basic morphological data it produces a unique ‘dispersion index’ which quantifies the state of dispersion. An advanced anomaly detection feature records images of any outlying particles that are particularly unusual in terms of size or shape. These metrics provide quick and effective insight and supporting evidence for method development, troubleshooting and validation. |
Figure 2 shows particle size measurements recorded under various dispersion conditions. In the first part of the test dispersion energy is being supplied by the pump and the stirrer but imaging data shows clearly that the sample remains agglomerated, a result reflected in a relatively high particle size result. Applying ultrasound disperses the agglomerates and measured particle size falls rapidly to a stable value that is retained once the ultrasound is switched off. Imaging confirms that the sample is now stably dispersed (final panel of the graph).
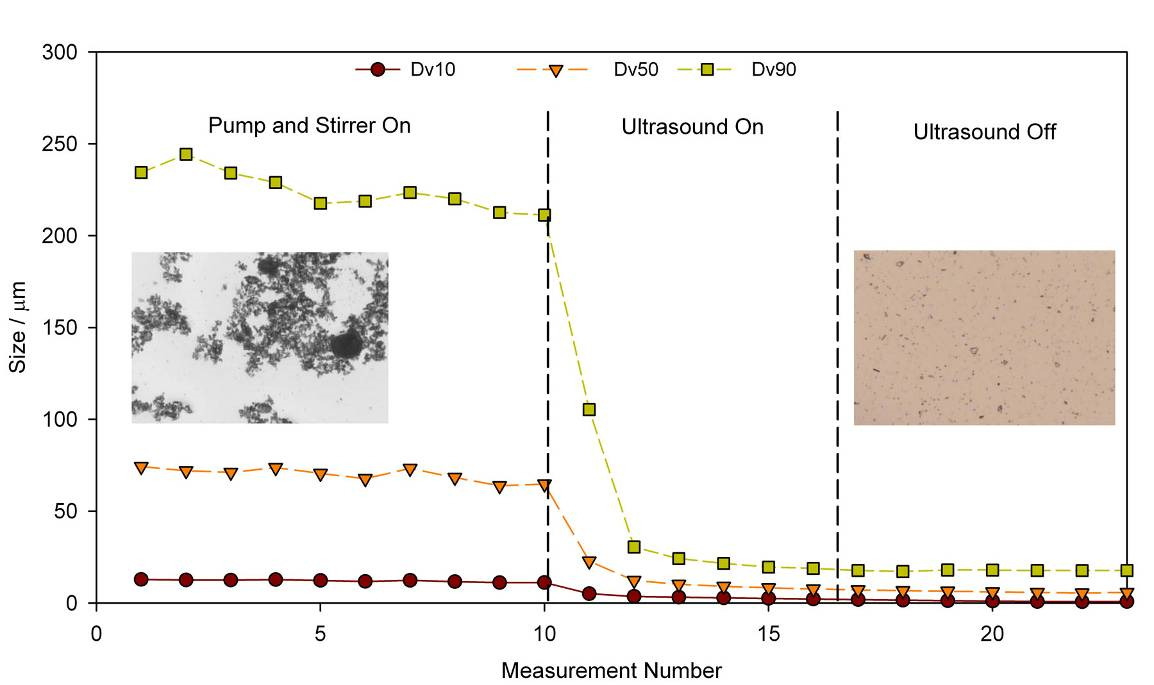
Figure 2: The application of ultrasound boosts the energy input from the pump and stirrer and deagglomerates the sample to form a dispersion that remains stable once the ultrasound is switched off
Method failures or changes in measured data associated with sub-optimal dispersion include:
The ideal sample for laser diffraction analysis is sufficiently concentrated to give a stable scattering signal but dilute enough to avoid multiple scattering. Multiple scattering is when the light interacts with more than one particle prior to detection, rather than the single interaction assumed by the models that underpin laser diffraction analysis, and leads to an underestimation of particle size.
Obscuration is a measure of the percentage of emitted laser light that is lost by scattering or absorption and therefore correlates with sample concentration. Plotting measured particle size as a function of obscuration – carrying out an obscuration titration – verifies that results are independent of concentration.
Figure 3 shows obscuration titrations for two samples, one with particles in the submicron region, the other with particles having a Dv50 of over 30 microns.
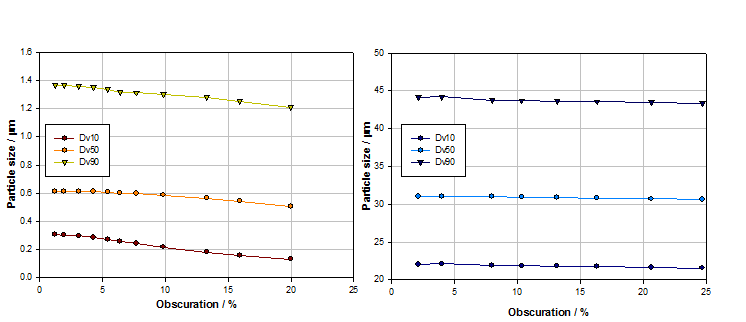
Figure 3: Obscuration titrations for submicron (left) and larger particle samples (right) identify suitable concentration ranges for measurement, which is easier for the coarser sample
With the submicron sized sample, particle size begins to decrease at obscurations above 5% as multiple scattering begins to have an appreciable effect. For the sample containing larger particles, particle size is stable over a much wider obscuration range. Larger particles scatter light at relatively high intensity and narrow angles so multiple scattering and signal to noise ratio is less of an issue. Where larger particles are present, or the particle size distribution is particularly wide, concentration may be set simply on the basis of ensuring that enough of the sample is dispersed to accurately reflect the properties of the bulk material, in a manageable volume of dispersant.
The right measurement time will produce representative data and at the same time optimize instrument productivity.
The measurement process involves recording the scattering pattern produced as the sample passes through the path of the laser. It is preceded by an initial background measurement which captures scattering from the cell windows, any contaminant present and, in the case of wet measurement, the pure dispersant. This process assesses cleanliness and allows precise capture of the scattering pattern specifically for the sample.
The duration of sample measurement can directly impact the results obtained in a number of ways. For example, larger, more free-flowing particles within a dry sample may arrive at the measurement cell before those that are finer, making it important to ensure that the entire sub sample is measured, to avoid unrepresentative data. Setting obscuration (concentration) limits to prevent measurement when the powder concentration is too low to give a reliable signal to noise ratio, or, conversely so high that multiple scattering is likely, provides effective control for measurement duration in routine practice.
Tools that help: SOP PlayerAssessing the impact of dispersion is easy with the SOP playlist which enables the measurement of samples in different states of dispersion as part of an automated sequence, to compare the results of alternative methods. This helps to accelerate method development to a successful conclusion. |
With a wet dispersion, measurement duration can be specified to analyze just a small fraction of the sample, or, at the other extreme, to repeatedly measure the same sample, since the dispersion can be re-circulated through the measurement cell several times. Here plotting particle size as a function of measurement duration identifies an optimal approach.
Figure 4 shows particle size data measured during a wet measurement as a function of measurement time (number). The data demonstrate how excessively long measurement times are unnecessary, since particle size results have stabilized, but an overly short measurement time may give unrepresentative data. This is especially true if the sample contains a broad distribution and/or coarser particles. The poor repeatability and smaller particle size recorded at low measurement times in this experiment are directly attributable to the insufficient sampling of large particles, an issue which is easily resolved by extending measurement duration.
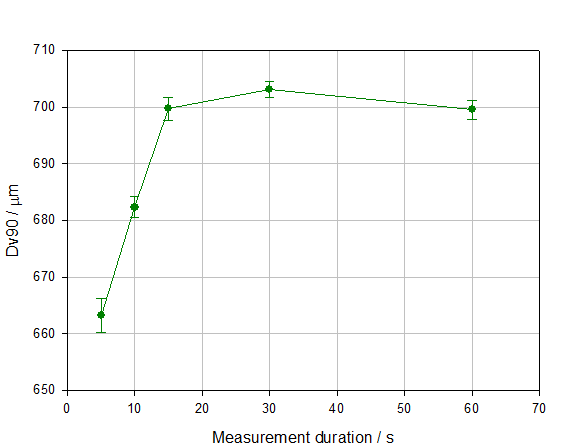
Figure 4: Dv90 as a function of measurement time during a wet measurement
While repeatability quantifies the variability associated with duplicate measurements of the same sample, it is reproducibility that shows up the variability that arises from your defined method, in its entirety.
Assessing repeatability involves duplicate measurements of the same sample and will highlight problems with the precision of the instrument, and/or the consistency of the sample. ISO13320 provides acceptance criteria for performance verification with an appropriate standard, with broader acceptance criteria for particle size metrics at the extremes of the particle size distribution.
Repeatability for any given application can be quantified using the coefficient of variation (%COV), which is defined according to the following equation:

ISO13320 [1] recommends that the %COV should be less than 3% for parameters such as the Dv50, and less than 5% for parameters at the extremes of the distribution such as the Dv10 and Dv90. However these values can be doubled for samples containing particles smaller than 10 microns, because of the difficulties of dispersion. Under ideal conditions much better performance is readily achievable and a %COV of less than 0.5% for samples larger than 1 micron and below 1% for samples finer than this, is realistic.
Tools that help: Data Quality ToolThe Mastersizer 3000 Data Quality Tool allows users to routinely check the variability of their data and confirm whether results meet the repeatability and reproducibility requirements outlined in standards such as ISO13320. By providing robust verification of data quality it maintains the integrity of the analytical information flow, safeguarding product quality and efficient plant operation. |
This is assessed by measuring several samples from the same batch of material and tests the entirety of the measurement method, including how representative the sampling procedure is. The recommended acceptance criteria for reproducibility testing is a %COV of less than 10% on Dv50 or any similar central value and less than 15% on values towards the edge of the distribution such as Dv10 and Dv90. Once again these limits are doubled for samples containing particles smaller than 10 microns, and, as before much higher levels of performance should be achievable with a modern system and a robust method.
Understanding laser diffractionLaser diffraction measures particle size distributions by detecting angular variations in the intensity of light scattered by particles illuminated by a collimated laser beam. Large particles generate a high scattering intensity at relatively narrow angles to the incident beam, while smaller particles produce a lower intensity signal but at much wider angles. Application of an appropriate model of light behavior therefore enables the generation of a particle size distribution, for the sample, from the measured angular scattering intensity data. Either Mie theory or the Fraunhofer approximation (of Mie theory) is used routinely, with Mie theory confirmed as the model of choice by ISO13320:2009 especially for measurements across a wide dynamic range.
Key practicalities to note about laser diffraction are:
|
Laser diffraction particle sizing should now be a matter of highly automated push button operation and should robustly deliver highly reproducible data. If your particle size analyses are not meeting these standards then the method may well be an issue. Following the guidance outlined here will help to identify the source of any problem and a suitable remedy, but more importantly will help you to develop a robust, trouble-free method, from the outset.
[1] ISO 13320 (2009) Particle Size Analysis – Laser Diffraction Methods. Part 1: General Principles.
[2] Sampling for particle size analysis - Whitepaper
[3] General Chapter <429>, “Light Diffraction Measurement Of Particle Size”, United States Pharmacopeia, Pharmacopoeial Forum (2005), 31, pp1235-1241